User Guide
If you can't find the answer to your question, please try asking in the forum or contact us here.
You can also join our Facebook community to discuss anything about Litchi.
Litchi for DJI Drones is compatible with: Mini 2, Mini SE (version 1 only), Air 2S, Mavic Mini 1, Mavic Air 2, Mavic 2 (Zoom/Pro), Mavic (Air/Pro), Phantom 4 (Standard/Advanced/Pro/ProV2), Phantom 3 (Standard/4K/Advanced/Professional), Inspire 1 (X3/Z3/Pro/RAW), Inspire 2 and Spark.
Litchi for DJI Drones is also compatible with DJI monitors, please refer to the installation steps in this guide
If you have one of DJI's latest drone models (Mini 3 and newer), you will need to use Litchi Pilot instead
Last Updated: 4 November 2025
General
When starting the app for the first time after installation, you will need to be connected to Internet in order to register the app with DJI servers. Registration with DJI servers can be done without being connected to a DJI drone.
The registration is done in the background, if the registration failed you will be notified with an error popup.
Be aware that some Internet connections may have troubles connecting to DJI servers, in such a case make sure to try a different Internet connection (home wifi, mobile data connection, a friend's connection, public wifi, etc).
Connecting Litchi to your drone
First, ensure you are using the latest DJI firmwares on both your drone and remote controller if you are using one. You can update the firmware using DJI Fly/Go, or for older drone models download them from dji.com. Then, depending on your mobile platform, follow the steps below.
Android
To connect using a cable (Mini, Air, Mavic, Phantom 3 Adv/Pro, Phantom 4 and Inspire series), follow these steps:
- Make sure no DJI-based apps (including DJI Fly, DJI Go and other third party apps) are running in the background. If there are any, close them
- If you have another app (such as DJI Fly or DJI Go) set as the default app to launch when you connect the remote controller, you will need to clear the defaults for that app: go to mobile device Settings - Apps - DJI Go (or other app name) - Clear Defaults. Some devices automatically set the app you start as default, so this step may have to be done every time you want to switch app (for example from DJI Fly to Litchi and vice versa)
- Start your drone and remote controller, and let them initialize for a few seconds
- Connect the remote controller to the mobile device. For Mavic drones, you can use either the bottom or side USB ports, however make sure to use only one port at once (if 2 cables are plugged in the remote controller, Litchi won't be able to connect)
- You will see a popup asking which app to start, select Litchi in the popup to initiate connection
To connect using Wi-Fi (Phantom 3 Standard/4K, Spark), follow these steps:
- Make sure no DJI-based apps (including DJI Go and other third party apps) are running in the background. If there are any, close them
- Force stop all DJI-based apps (including DJI Go and other third party apps). Please note step 1 is not enough. To force stop an app, go to your mobile device Settings - Apps - DJI Go (or other app name) - Force stop
- Start your drone and remote controller if you are using one, and let them initialize for a few seconds
- Connect to the Wi-Fi network of the drone
- Start Litchi
iOS
- Make sure no DJI-based apps (including DJI Fly, DJI Go and other third party apps) are running in the background. If there are any, close them
- Start your drone and remote controller if you are using one, and let them initialize for a few seconds
- Connect the remote controller to the mobile device using a cable. For Wi-Fi based drones (Phantom 3 Standard/4K or Spark), connect to the Wi-Fi network of the drone instead
- Start Litchi
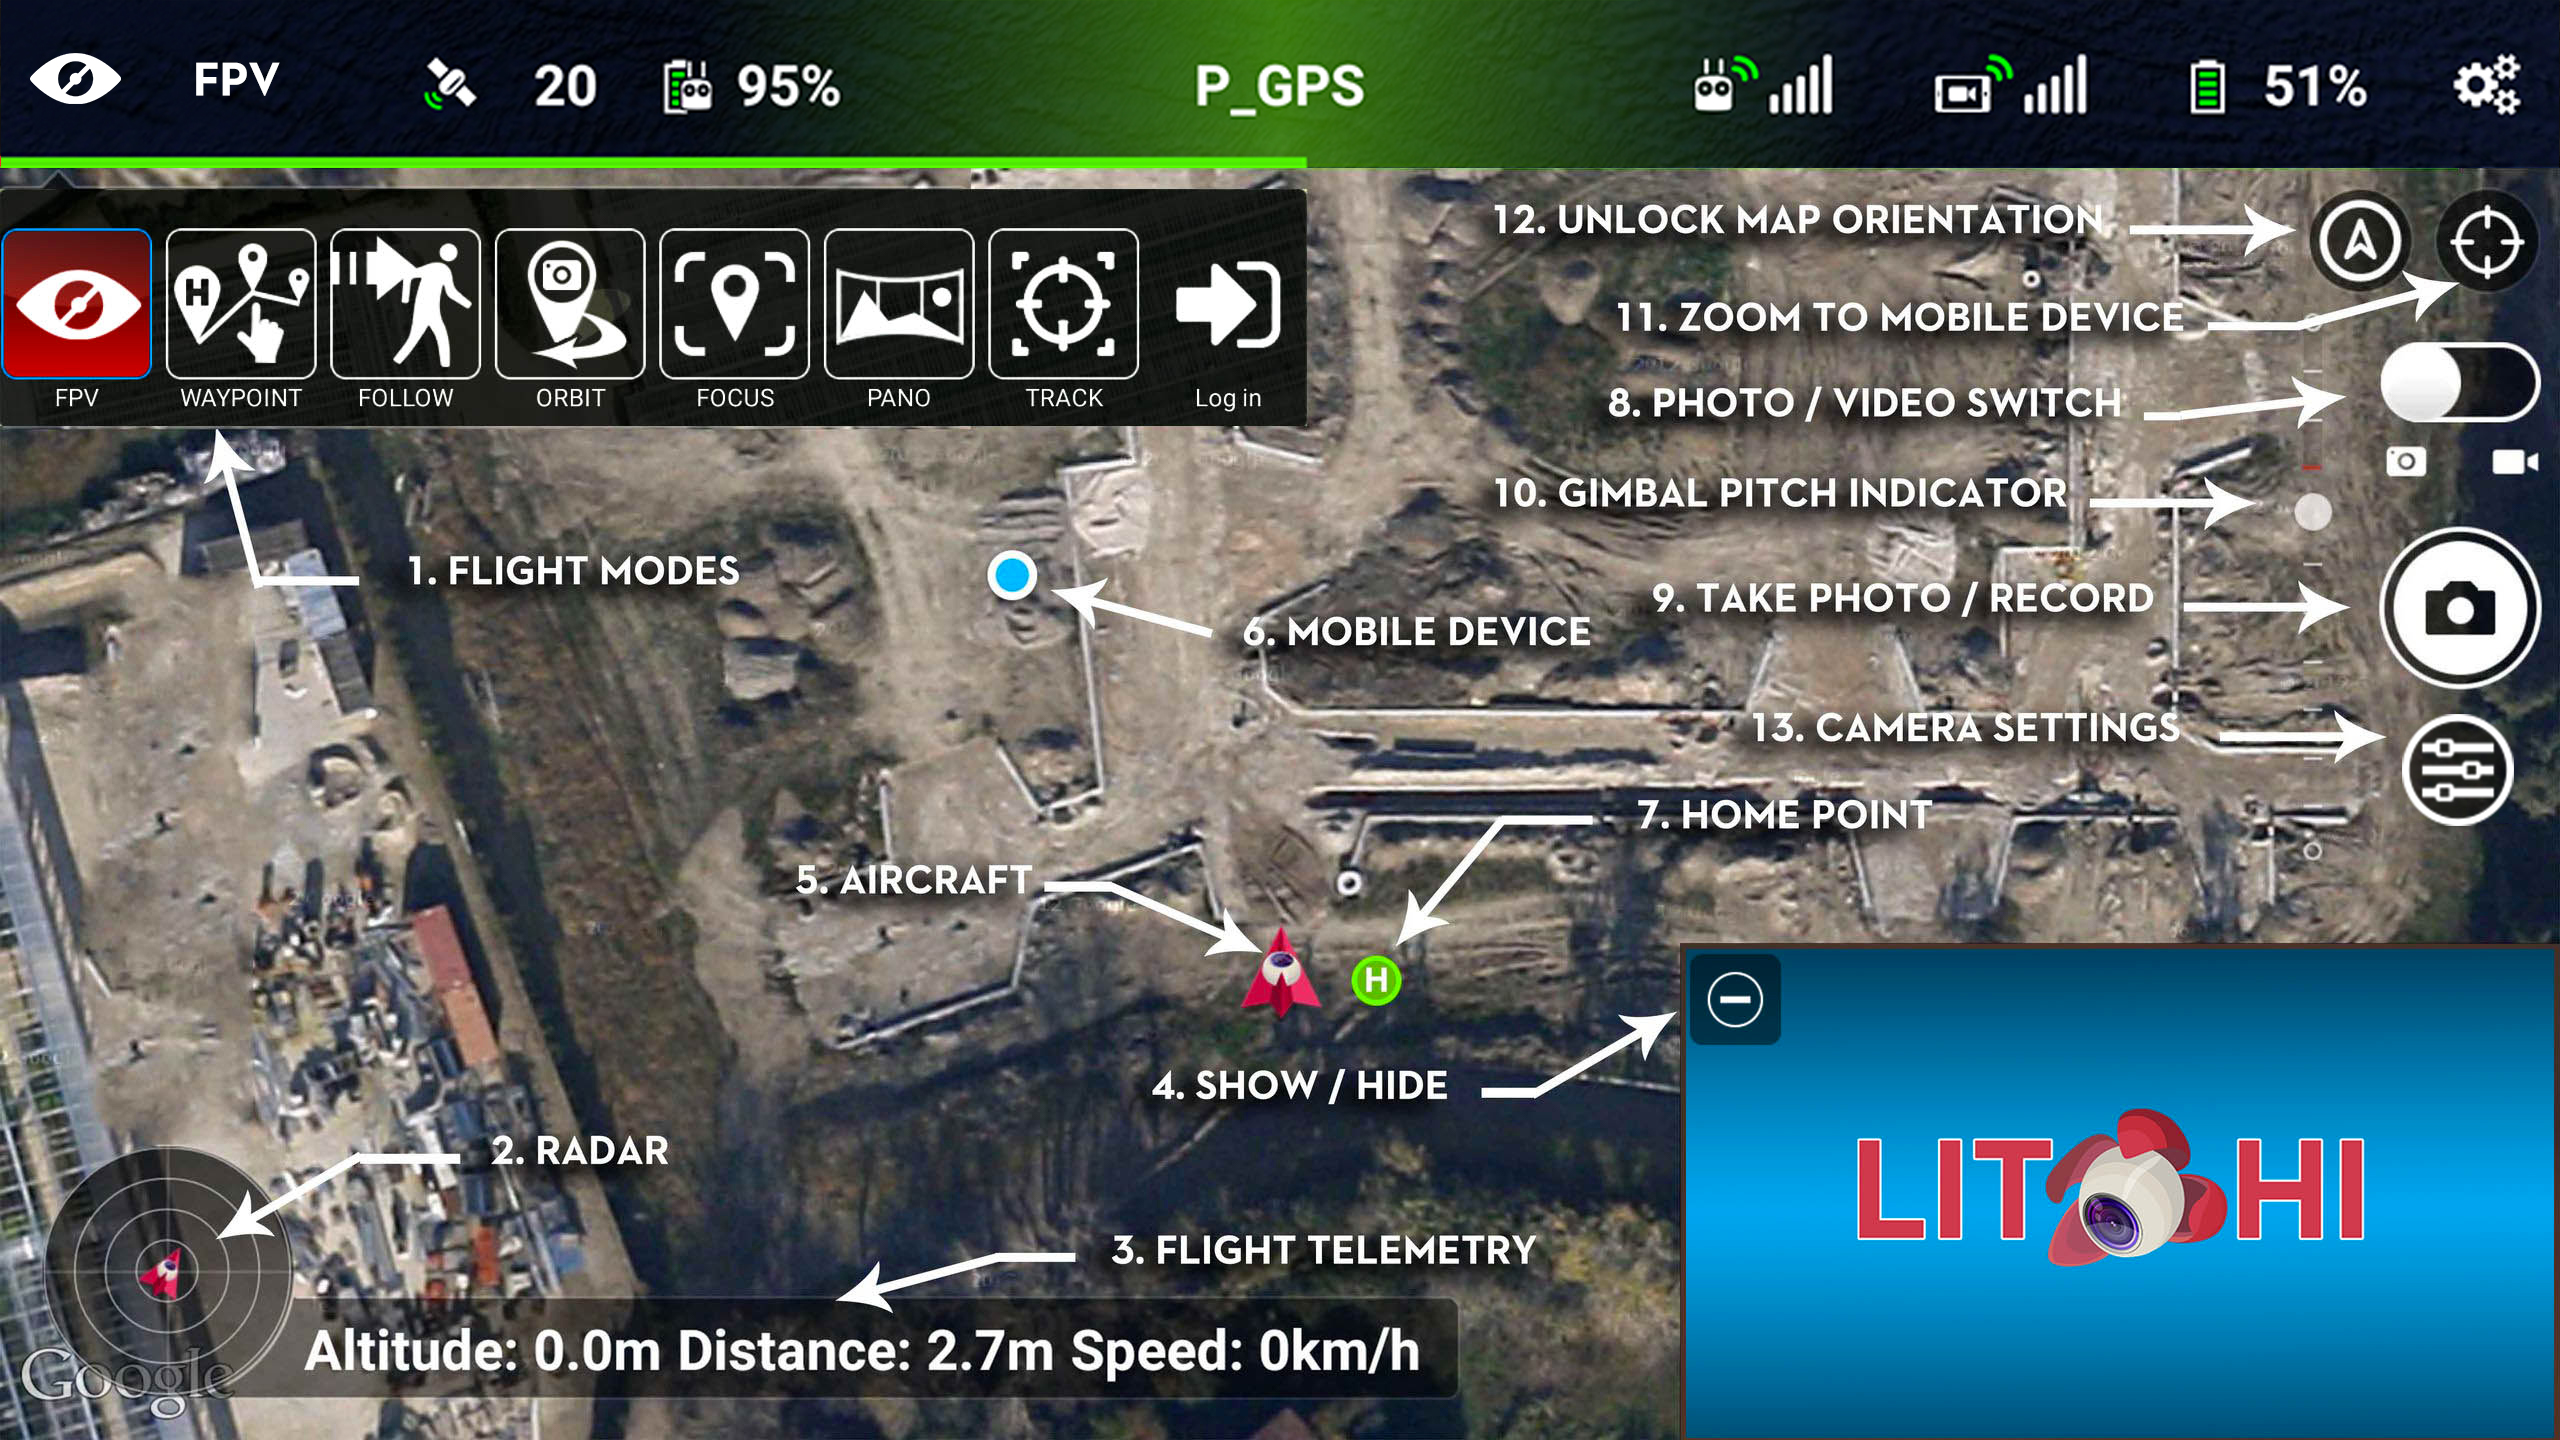
- Flight Modes: Use this dropdown to change the flight mode.
- Radar: Shows the position of the aircraft relative to the operator's mobile device (Android only).
- Flight Telemetry: Shows altitude relative to take-off elevation, distance from home point to aircraft and speed on all axis. In Follow mode, the distance between the mobile device and the aircraft is shown.
- Show/hide small view: Tap to minimize the size of the small view. Tap on the small view to switch the map and video views.
- Aircraft: Shows the aircraft location on the map. Tap to add a Waypoint or Point of Interest at the aircraft location.
- Mobile Device: Shows the mobile device location on the map. Tap to add a Waypoint or Point of Interest at the mobile device location.
- Home Point: Shows the home point location on the map. To set a new home point, drag this marker to another location. You must be flying in order to move the Home Point.
- Photo/Video Switch: Use to change the camera mode.
- Take Photo/Record: Tap this button to take a picture while in photo mode. Tap to start and stop recording while in video mode.
- Gimbal Pitch Indicator: Shows the current position of the gimbal tilt. Top is +30° above horizon, bottom is -90°. Tap on this indicator to toggle between bottom and top gimbal positions.
- Zoom to Mobile Device: Tap to zoom the map to the current mobile device location.
- Unlock Map Orientation: By default the map is oriented towards North. Tap to have the map rotation continuously adjusted to match your mobile device's position relative to north.
- Camera Settings: Tap to open camera settings.
Status Bar

- Mode Switch Button: Tap to change the flight mode or to log in to your Litchi account.
- Satellite Count: Shows the number of satellites that the aircraft is locked onto.
- RC Battery/Virtual Joysticks: Shows the remaining remote controller battery percentage. When connected to a drone without remote controller, tap to show/hide the virtual on-screen joysticks.
- Battery Status: This bar shows the status of the aircraft battery. The part in red represents the battery required to go home.
- Aircraft Status: Shows the current aircraft flight status.
- Uplink: Shows the strength of the remote controller uplink signal. For Mavic Mini 1 and Mini SE, the flight mode (Normal/P,Sport,Cine) is displayed in this location, tap to change the flight mode.
- Downlink: Shows the strength of the video downlink signal.
- Aircraft Battery: Shows the remaining aircraft battery percentage.
- General Settings: Tap to show general settings.
Regaining Control
Whenever the drone flies autonomously, you can regain control instantly at any time using the remote controller's flight mode switch.
- For newer drone models (Mini 2, Air, Mavic, Phantom, Spark and Inspire series), toggle the flight mode switch from Normal/P to Sport mode in order to regain control. You may switch back to Normal/P mode afterwards.
- For Mavic Mini 1 and Mini SE, use the flight mode button in the top bar to switch from Normal/P to Sport mode in order to regain control. You may switch back to Normal/P mode afterwards. In addition, by default the RTH button on the remote controller can be used to pause an autonomous flight.
- For older drone models (Phantom 3, Inspire 1), toggle the flight mode switch from F to Normal/P mode in order to regain control. You may switch back to F mode afterwards.
Simulator Mode
The Simulator mode lets you try the Litchi flight modes without actually flying the drone in the real world. A connection to the drone is however still required.
Simulator mode can be enabled with a long press at the center of the top bar. The top bar's background color will change to purple to indicate that the drone is in Simulator mode.
Once enabled, you can fly the drone virtually, the rotors will not spin up when taking off.
Disable Simulator mode using a long press again at the center of the top bar. The drone must then be restarted if you wish to perform a real flight.
Camera Settings
General camera settings as well as shooting modes (Single/HDR/Burst/AEB/Interval) can be adjusted after a tap on the camera settings icon under the shutter/record button.
An exposure info panel is also shown at the top of the video screen when connected to the aircraft.
To set the ISO/Shutter Speed/Aperture/Exposure Compensation, tap on the Camera Settings button, then "Exposure Settings".
Camera Focus
For cameras with adjustable focus, the camera focus mode can be changed in the camera settings. Available modes are Auto, AFC and Manual.
To set the focus on a specific location, make sure you are in Auto or AFC focus mode then tap anywhere on the video preview to trigger autofocus at that location.
To set the focus to Infinity (everything in focus), switch to Manual focus mode then tap on the Infinity (∞) button. Alternatively you can use the custom function "Focus to Infinity". Before using Infinity focus for the first time, it is recommended to calibrate the lens. Tap on "Calibrate Lens" in the camera settings then follow the steps on-screen.
Exposure Metering
By default exposure metering is in Average mode. Tap anywhere on the video preview to change to Spot metering mode at that location.
To go back to Average metering mode, tap again on the Spot metering icon and the icon will disappear.
Info If your camera supports adjustable focus, you first need to do a long press on the green square icon at the top left of the video preview to switch from Focus mode to Metering mode.
Camera Zoom
Optical/Digital zoom: For cameras which support optical or digital zoom but cannot be adjusted using the RC's right wheel: hold the RC's Fn/C2 button and use the left RC wheel to adjust the zoom.
Custom Function: It is also possible to control the zoom (optical or digital) using the custom functions "Zoom In" and "Zoom Out". Only for cameras which support zoom in the DJI firmware.
Gimbal Roll Adjustment
To adjust the gimbal's roll angle, hold the RC's C2 button and use the right RC wheel.
Bluetooth Controllers
Litchi allows you to control Wi-Fi based drones (Spark, Phantom 3 Standard, Mavic Air/Pro) with a bluetooth controller when no DJI remote controller is connected.
If you are looking for a compatible bluetooth controller, we recommend the Mad Catz CTRL i for iOS.
Litchi will automatically recognize and accept input from a bluetooth controller after it is paired with your mobile device.
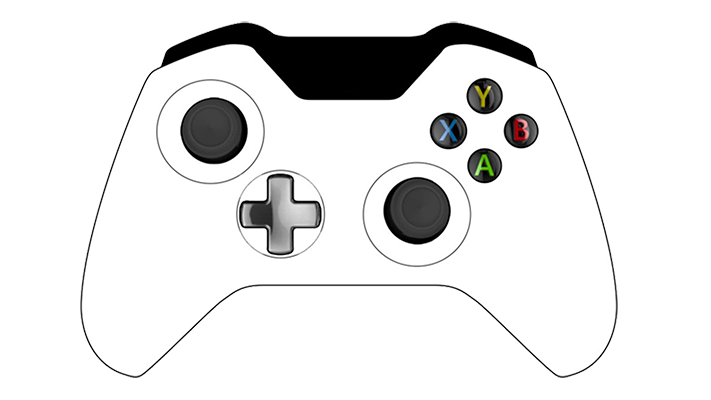
- Left and Right Joysticks: Used to control the drone the same way you would control a drone with a DJI remote controller in mode 2.
- A: Take a photo.
- X: Start/Stop recording.
- B: Triggers the custom function bound to C1.
- Y: Triggers the custom function bound to C2.
- Directional Pad - Y axis: Moves the gimbal up/down.
FPV
The FPV mode allows you to fly the aircraft manually using the joysticks.
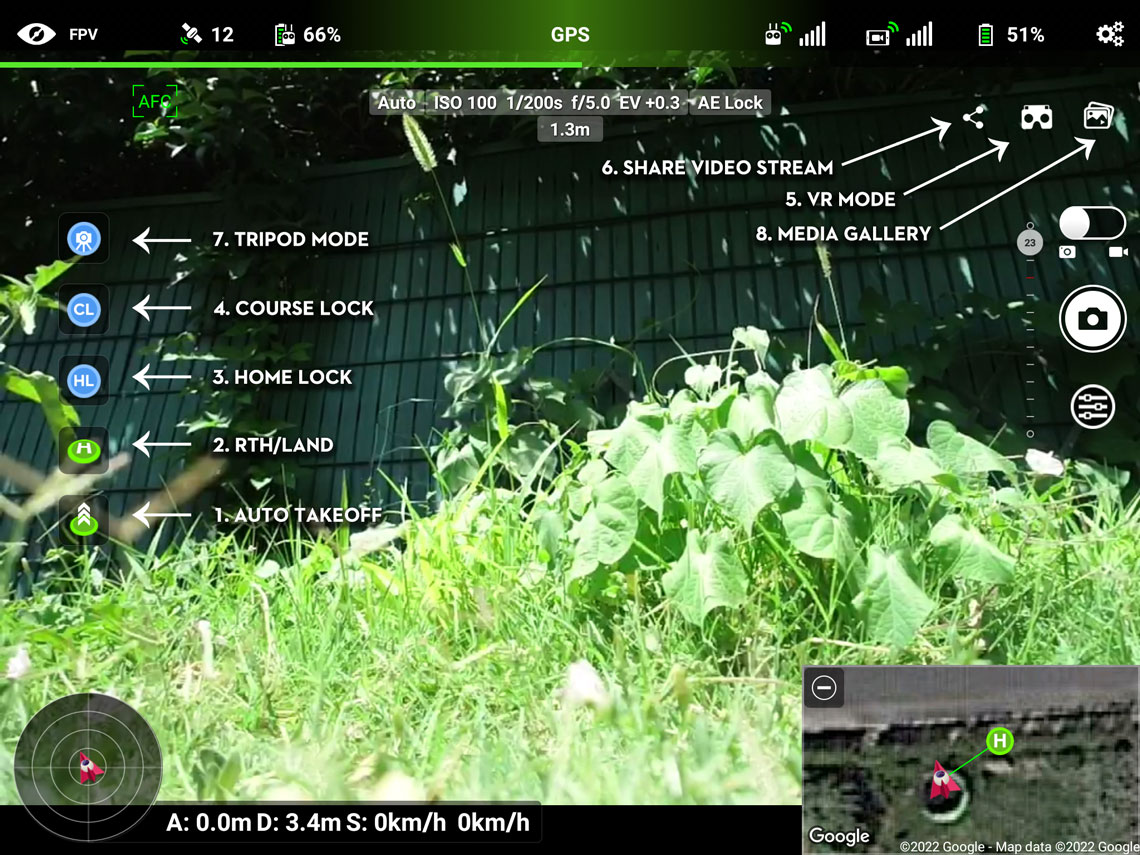
- Auto TakeOff: Use this to perform an automatic take off. The aircraft will rise to 1.2m and hover.
- RTH/Land: Use this to perform a Return to Home or Landing.
- Home Lock: When enabled, moving the right joystick down (mode 2) will bring the aircraft back to the home point regardless of its current heading. Not supported by Mavic Mini 1/Mini SE/Mini 2/Mavic Air 2/Air 2S.
- Course Lock: When enabled, moving the right joystick up/down (mode 2) will move the aircraft forward/backward in the direction defined by its heading at the time Course Lock was enabled. Not supported by Mavic Mini 1/Mini SE/Mini 2/Mavic Air 2/Air 2S.
- VR Mode: Enter VR mode using this button.
- Share Video Stream: Tap to share your video stream. You can share it to a RTMP server (Twitch, Youtube, Facebook etc) or to a nearby device running the Litchi Vue app.
- Tripod Mode: Enable/disable Tripod mode. In Tripod mode, the maximum speed is limited to 2.2mph (3.6kph). Responsiveness to joystick movements is also reduced for smoother and more controlled movements. Tripod mode is only supported by the following drone models (Phantom 4 Normal/Advanced/Pro/ProV2, Inspire 2, Spark, Mavic Air/Pro, Mavic 2 Zoom/Pro). For Mavic 2 Zoom/Pro, Mavic Mini 1, Mini SE, Mavic Air 2 and Air 2S, enable Tripod/Cine mode using the RC mode switch.
- Media Gallery: Tap to enter the media gallery which lets you review and download media from the drone's storage. Android only
Litchi Vue Streaming
Litchi Vue lets you stream your drone's video feed to a second mobile device using a Wi-Fi connection.
The following video explains how to use Litchi Vue:
Follow these steps to setup Litchi Vue:
- Ensure both mobile devices are connected to the same Wi-Fi network (via a personal hotspot or external Wi-Fi router, Internet is NOT required)
- Connect the drone to the pilot's mobile device (device A) and start Litchi for DJI Drones
- On device A, tap on the share button at the top right corner of the video view, then select 'Litchi Vue'. The button will turn yellow indicating the device is now available for streaming
- Start the Litchi Vue app (download for Android or iOS) on the second mobile device (device B), you should then see the name of device A appear in the list of the available streams. Tap on it to connect
- The drone's video stream will now be displayed on both mobile devices. On device A, the share icon turns green indicating you are connected to device B
Within the Litchi Vue app, you can enable VR mode for better immersion.
Important Because Litchi Vue requires a Wi-Fi connection between the 2 devices, it is not compatible with Wi-Fi based aircraft models such as the P3 Standard and the P3 4K.
Waypoint
Waypoint mode lets you plan a path made of several waypoints that the drone can then fly autonomously.
Classic waypoint missions can be planned as well as advanced camera moves such as Selfies and Cable Cams.
Enter the Waypoint mode by pressing the Flight Mode icon at the top left of the Litchi screen. Select "Waypoint". You can then start editing missions.
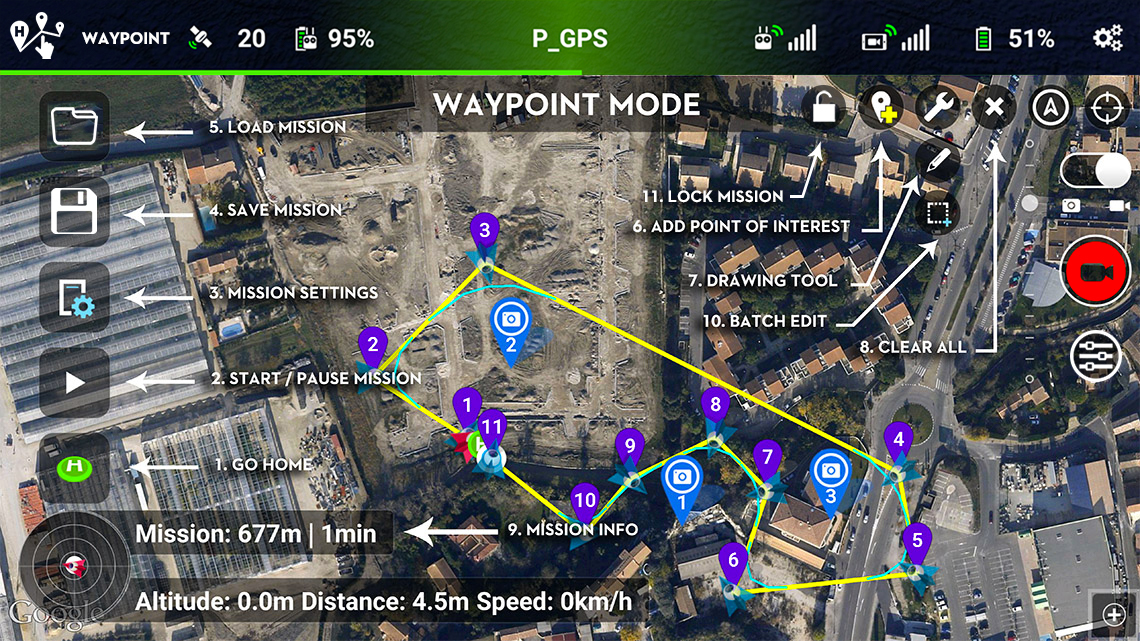
- Go Home: Tap to trigger Return to Home (Android only). Return to Home can also be triggered using the remote controller.
- Start/Pause/Resume Mission: In edit mode, tap this button to show the pre-flight report and then start the mission. While in a mission, this button will allow you to pause and resume the waypoint mission.
- Mission Settings: Tap this button to display the mission settings.
- Save Mission: Tap this button to save a mission.
- Load Mission: Tap this button to load a previously saved mission.
- Add Point of Interest: Toggles the Point of Interest mode. When on, a click on the map will add a Point of Interest.
- Drawing Tool: Toggles the drawing tool. When on, you will be able to draw a path of waypoints on the map.
- Clear All: Tap to reset everything in the editor.
- Mission Info: Shows general mission information. In edit mode, the total distance and time will be shown. During a mission, the "target" waypoint number will be shown, as well as the current state of the aircraft.
- Batch Edit: Tap to enter Batch Edit mode. Allows you to easily edit multiple waypoints at once.
- Lock Mission: Tap to lock/unlock the mission for editing. A mission's waypoints cannot be edited until the mission is unlocked. By default, missions are locked after they are loaded.
Mission Settings
- Heading Mode: Defines the heading of the aircraft during the mission. Choose between "Toward next Waypoint" ("Auto" on iOS) where the aircraft will point toward the next waypoint, "Initial Direction" ("Initial" on iOS) where the aircraft will keep the heading it has when the mission is started, "User Controlled" ("Manual" on iOS) where you are able to control the heading of the aircraft during the mission using the left joystick left/right (mode 2) or "Waypoint Defined" ("Custom" on iOS) where the aircraft will use the heading defined at each waypoint. Using "Waypoint Defined" ("Custom" on iOS) also means that the aircraft will smoothly transition from one waypoint's heading to the next.
- Finish Action: Choose an action that the aircraft will perform at the end of the mission. Available choices are "None", "Go Home" ("RTH" on iOS), "Land", "Back to First Waypoint" ("Back to 1st" on iOS) and "Reverse". When using "Reverse", the only way for the mission to end is if you manually stop it, "Reverse" allows you to let the aircraft fly to the last waypoint and then replay the mission in reverse using the joysticks or the cruising speed slider.
- Path Mode: Choose between "Straight Lines" where the aircraft will go straight to each waypoint then turn, or "Curved Turns" where the aircraft will not stop at waypoints and instead take curved turns (how large the curved turns are depends on each waypoint's curved size setting).
- Cruising Speed: Defines the autonomous flight speed of the aircraft. If you do not use the remote controller's right joystick (mode 2) during the mission, the speed the aircraft will travel at is the cruising speed. Can be set to negative values if you want the aircraft to travel backwards autonomously. Can be adjusted while the mission is in progress.
- Max Flight Speed: If you use the remote controller's right joystick (mode 2) while the mission is in progress, you can increase the speed of the aircraft up to the "Max Flight Speed".
- Photo Capture Interval: Defines the default time/distance interval in seconds/meters when two photos are taken as the aircraft moves from waypoint to waypoint. The interval can be set between 0 and 100 seconds/meters. The interval restarts at each waypoint. If the requested interval exceeds the camera's capability, the photos will be taken at the maximum possible speed.
- Default Curve Size: When adding a new waypoint, the previous waypoint's curved size will be set to the "default curve size percentage" of the minimum length available on both adjacent sides of the waypoint.
- Default Gimbal Pitch Mode: Default Gimbal Pitch Mode to be used for newly added waypoints.
- Rotations Direction: When set to Managed, aircraft rotations from waypoint to waypoint will always use the shortest direction (clockwise/anticlockwise).
Waypoints
To add a waypoint, tap anywhere on the map (make sure that the POI toggle is not on).
Info It is also possible to add a waypoint at the drone's current location when it is already flying using the custom function "Waypoint at Aircraft" which can be bound to one of the customizable remote controller buttons in the 'Keys' settings section.
To view the waypoint settings, tap the waypoint itself. To drag a waypoint, do a long press on the waypoint, then move it around.
To delete a waypoint, tap the waypoint to open its settings, then tap the minus icon at the top left corner of the waypoint settings window.
To insert a waypoint between two consecutive waypoints, tap the first waypoint of the two to open its settings, then tap the plus icon at the top left corner of the waypoint settings window. A waypoint will then be inserted between this waypoint and the next, it will be placed exactly in the middle of these two waypoints.
Important The 3D distance between consecutive waypoints must be between 0.6m and 1999m.
Waypoint Settings
- Altitude: The altitude of the waypoint relative to the elevation of the aircraft where it took off. The waypoint's altitude is also shown above the waypoint marker on the map.
- Speed: The speed at which the aircraft will travel from this waypoint to the next. By default the aircraft will use the mission's cruising speed setting, but the cruising speed can be overriden for each waypoint using this setting.
- Curve Size: Defines the size of the curved turn at this waypoint. A bigger size means the aircraft will start the turn earlier while travelling to this waypoint. This setting only applies when the mission setting "Path Mode" is set to "Curved Turns". It also does not apply to the first and last waypoints as there are no turns at these waypoints.
Info The path of the curve is drawn in turquoise on the map. It will update dynamically as you adjust the curve size setting. - Heading: The direction relative to north in which the aircraft will look at when arriving at this waypoint (0° is North, 90° is East). This setting only applies when the mission setting "Heading Mode" is set to "Waypoint Defined" ("Custom" on iOS). If two consecutive waypoints have different headings, the aircraft will smoothly transition from one heading to the other while travelling from the first waypoint to the second.
Info The waypoint heading is represented by the blue aircraft icon on top of each waypoint. It will update dynamically as you adjust the heading setting. - Rotation: When two consecutive waypoints have different headings, the aircraft will smoothly rotate from the first heading to the next. This setting defines the direction in which the aircraft will rotate, clockwise or anti-clockwise.
- Gimbal Pitch: Choose between "Disabled" where the gimbal pitch control will be manual, "Focus POI" where Litchi will automatically control the gimbal pitch to keep the selected POI in the center of the frame (blue markers), or "Interpolate" where you can specify the gimbal pitch angle at this waypoint. For "Interpolate" to work, the previous or next waypoint need to be set to "Interpolate" as well. Litchi will then automatically adjust the gimbal pitch angle to start and end at the specified angles, and smoothly transition while travelling between the two waypoints.
- POI: Use this setting to change which POI a waypoint will focus on. By default, when adding a waypoint it will focus on the nearest POI, if there is one.
- Photo Capture Interval: Defines the time/distance interval in seconds/meters when two photos are taken as the aircraft moves from this waypoint to the next. The interval can be set between 0 and 100 seconds/meters. The first photo will be taken as the aircraft leaves the current waypoint. If the requested interval exceeds the camera's capability, the photos will be taken at the maximum possible speed. By default, this setting uses the global 'Photo Capture Interval' mission setting's value.
- Actions: Each waypoint can have up to 15 different actions (more details below).
Waypoint Actions
Actions are performed when the aircraft arrives at the waypoint. There are six different waypoint actions, three of which accept an additional parameter.
You can add up to 15 different actions for each waypoint.
Important Waypoint actions are ignored when the mission "Path Mode" is "Curved Turns" as the aircraft will not stop at waypoints then.
- Stay for: The time in seconds that the aircraft should pause at the waypoint. Maximum 32 seconds.
- Take Photo: The camera will take one picture. For this action to work, recording must of off.
- Start Recording: The camera will start recording.
- Stop Recording: The camera will stop recording.
- Rotate Aircraft: The aircraft will rotate to the specified angle. The parameter is the angle relative to North that the aircraft should rotate to (0° is North, 90° is East). For example, setting it to 270° means that the aircraft will rotate to point towards West. If the aircraft is already pointing West before starting this action, it will not rotate at all.
- Tilt Camera: The gimbal will move to the specified angle (tilt). The valid value range is +0° to -90° (look down).
Panorama Preset
Important Ensure that the aircraft is not recording when it arrives at a waypoint for a panorama as the preset will not stop recording automatically.
Point of Interests

Additionally, Point of Interests also enable the use of the "Focus POI" waypoint gimbal setting.
To enter POI edit mode, tap the POI toggle located in the top right corner of the map. When this button is enabled, tap anywhere on the map to place a POI.
When adding a new POI, all waypoints which have no assigned POI will have their heading setting adjusted in order to target the new POI.
To drag a POI, do a long press on the POI, then move it around. This will automatically adjust the heading setting of the waypoints that are currently targetting the POI.
To view the POI settings, tap on the POI. You will be able to adjust the POI's altitude which is used for the "Focus POI" waypoint gimbal setting.
To delete a POI, while the POI settings window is displayed, tap on the top left corner trash icon. Deleting a POI will automatically reassign nearest POIs for waypoints which had the now-deleted POI in target.
Waypoint Gimbal Pitch
Litchi can control the gimbal pitch automatically during the mission, as long as the aircraft is within range of the remote controller or if DJI's gimbal interpolation is enabled. To specify how the gimbal pitch should be controlled, each waypoint has a Gimbal Pitch setting which can be one of the following:
- Disabled: The gimbal pitch control will be manual from this waypoint.
- Focus POI: Litchi will automatically control the gimbal pitch from this waypoint to the next to keep the selected POI in the center of the frame. The POI altitude will be taken into account to determine the gimbal pitch angle.
- Interpolate: You can specify the gimbal pitch angle at this waypoint. For "Interpolate" to work, the previous or next waypoint need to be set to "Interpolate" as well. Litchi will then automatically adjust the gimbal pitch angle to start and end at the specified angles, and smoothly transition while travelling between the two waypoints.
Drawing Tool

To enter the drawing mode, tap the pencil icon located in the top right corner of the map, under the Tools submenu. Then, draw the mission path on the map.
When you are done, lift your finger from the screen and a Batch waypoint settings window will appear, use it to set global settings for the waypoints that will be created from the drawn path.
In this window, you will find an additional setting, the "Waypoint Spacing" which is the minimum distance between the waypoints that will form the drawn path. Slide all the way to the left to select "Optimized" which will automatically determine the minimum amount of waypoints required to form the drawn path.
Batch Edit
The Batch Edit tool allows you to easily edit multiple waypoints at once.
To enter Batch Edit mode, tap the Batch Edit icon located in the top right corner of the map, under the Tools submenu.
While in Batch Edit mode, additional buttons will display at the bottom left of the screen which can be used to select all waypoints (Select All), edit selected waypoints (Edit), delete selected waypoints (Delete) or exit Batch Edit mode (Cancel).
To select a waypoint, tap on the waypoint's marker. You can select as many waypoints as you want.
To edit the selected waypoints, tap the "Edit" button located in the buttons bar at the bottom left of the screen. A waypoint settings window will then appear, it contains the same settings as when editing a single waypoint. When you are done making changes, tap the "Apply/OK" button to apply the changes you made to all previously selected waypoints. Only modified properties marked with a star icon will be applied to the selected waypoints.
For the altitude, there is an additional setting allowing you to set an altitude relative to the "Home" point (similar as when editing a single waypoint), relative to the "Current" waypoint altitudes, or relative to the "Ground".
"Current" can be used to increase or decrease multiple waypoint altitudes by an offset, for example if you set the altitude to +30m relative to "Current", all selected waypoints will have their current altitudes increased by 30m.
When the "Ground" option is selected, Litchi will automatically calculate the correct waypoint altitudes given the ground elevation at each waypoint, using the ground elevation at waypoint 1 as the reference. For the best results and because waypoint 1 is used as a reference, it is strongly advised to place waypoint 1 in a location close to where the drone will take off (i.e. similar ground elevation). This option requires internet as it uses the google elevation data which is only available online.
Loading / Saving a mission
Missions can be planned anywhere, you do not need to be connected to the aircraft in order to plan a mission.
To save a mission, tap the save button in the left button bar. Enter a filename, click Ok and the mission will then be saved in the "LitchiApp/missions" ("missions" on iOS) folder located in the mobile device's internal storage.
To load a mission, tap the load button in the left button bar, select the mission then click load.
When logged in to your Litchi account, missions will be synced automatically across all of your devices as well as on the Mission Hub.
By default, missions sync'ed in your account will be private and not visible to anyone unless you set them to public in the Mission Hub.
Running a mission
Press the "Play" button located in the left button bar to show the mission preflight report. If the mission is valid, you will be able to tap the "Start" button in the report window to start the mission. Before starting the mission, you can also select a specific starting waypoint.
Pausing a mission
Pausing a mission can be done by tapping on the pause button in the left bar.
Stopping a mission
Stopping a mission can be done using the red stop button in the left button bar.
Cookbook
Cable Cam
- Set Custom Button 1 to "Waypoint at Aircraft"
- Set Cruising Speed to 0 and RC Speed to the highest speed you want the aircraft to travel.
- Set Default Gimbal Pitch to "Interpolate"
- Fly the drone to the Waypoint 1 location, set your heading, and Gimbal Pitch,
and press Custom Button 1.
- Fly the drone to the Waypoint 2 location, set your heading, and Gimbal
Pitch, and press Custom Button 1.
- Run the mission.
- Set Custom Button 1 to "Waypoint at Aircraft"
- Set Custom Button 2 to "POI at Aircraft"
- Set Cruising Speed to 0 and RC Speed to the highest speed you want the aircraft to travel.
- Set Default Gimbal Pitch to "Focus POI"
- Fly the drone to the Waypoint 1 location and press Custom Button 1.
- Fly the drone to the POI location associated with the Waypoint 1 and press Custom Button 2
- Fly the drone to the Waypoint 2 location and press Custom Button 1
- Fly the drone to the POI location associated with the Waypoint 2 and press Custom Button 2
- Run the mission.
Selfie
- Set up Mission Parameters as desired
- Set Default Waypoint Gimbal Pitch to "Focus POI"
- Set Cruising Speed to 1. This is extremely important since that is the speed that the aircraft will fly as it tries to find the 1st WP.
- Set RC Speed to the max speed you want for the selfie.
- Set up Waypoints
- Start up and fly your aircraft to where you want the selfie to begin at least 10 meters away from people,
- Add a waypoint by one of the two following methods.
- Deselect the Add POI Button (if it is selected) and press the aircraft icon in the map view or
- Press a Custom Button that has been set to "Waypoint at Aircraft"
- Fly your aircraft to where you want the selfie to go next, and add another waypoint.
- Repeat this for as many waypoints as you want, always remembering to point the aircraft towards you and framing yourself in the video feed.
- Fly the aircraft back toward the start of the selfie mission.
- Set up POI. This will focus all your waypoints on yourself or any
subject for that matter.
- Place a POI at your location in one of the two following methods
- Press the Add POI button and press the blue dot, which represents the location of the RC, on the map screen or
- Press a Custom Button that has been set to "POI at Device".
- Run the mission
- Remember to change the flight mode to Sport (or Normal/P for older drone models) to cancel the mission.
- Press Run.
- Use the RC Pitch Stick (Forward/Back) to control the speed of the aircraft.
Mission Hub
Mission Hub lets you plan waypoint missions from a desktop or laptop PC/Mac.
If you are logged in to your Litchi account, saving a mission will automatically synchronize it across all devices where you are also logged in.
In addition, Mission Hub lets you browse missions from other users around the world or publish your own missions and videos for other users to see.
Info For the best experience, we recommend using the Google Chrome browser to access Mission Hub.
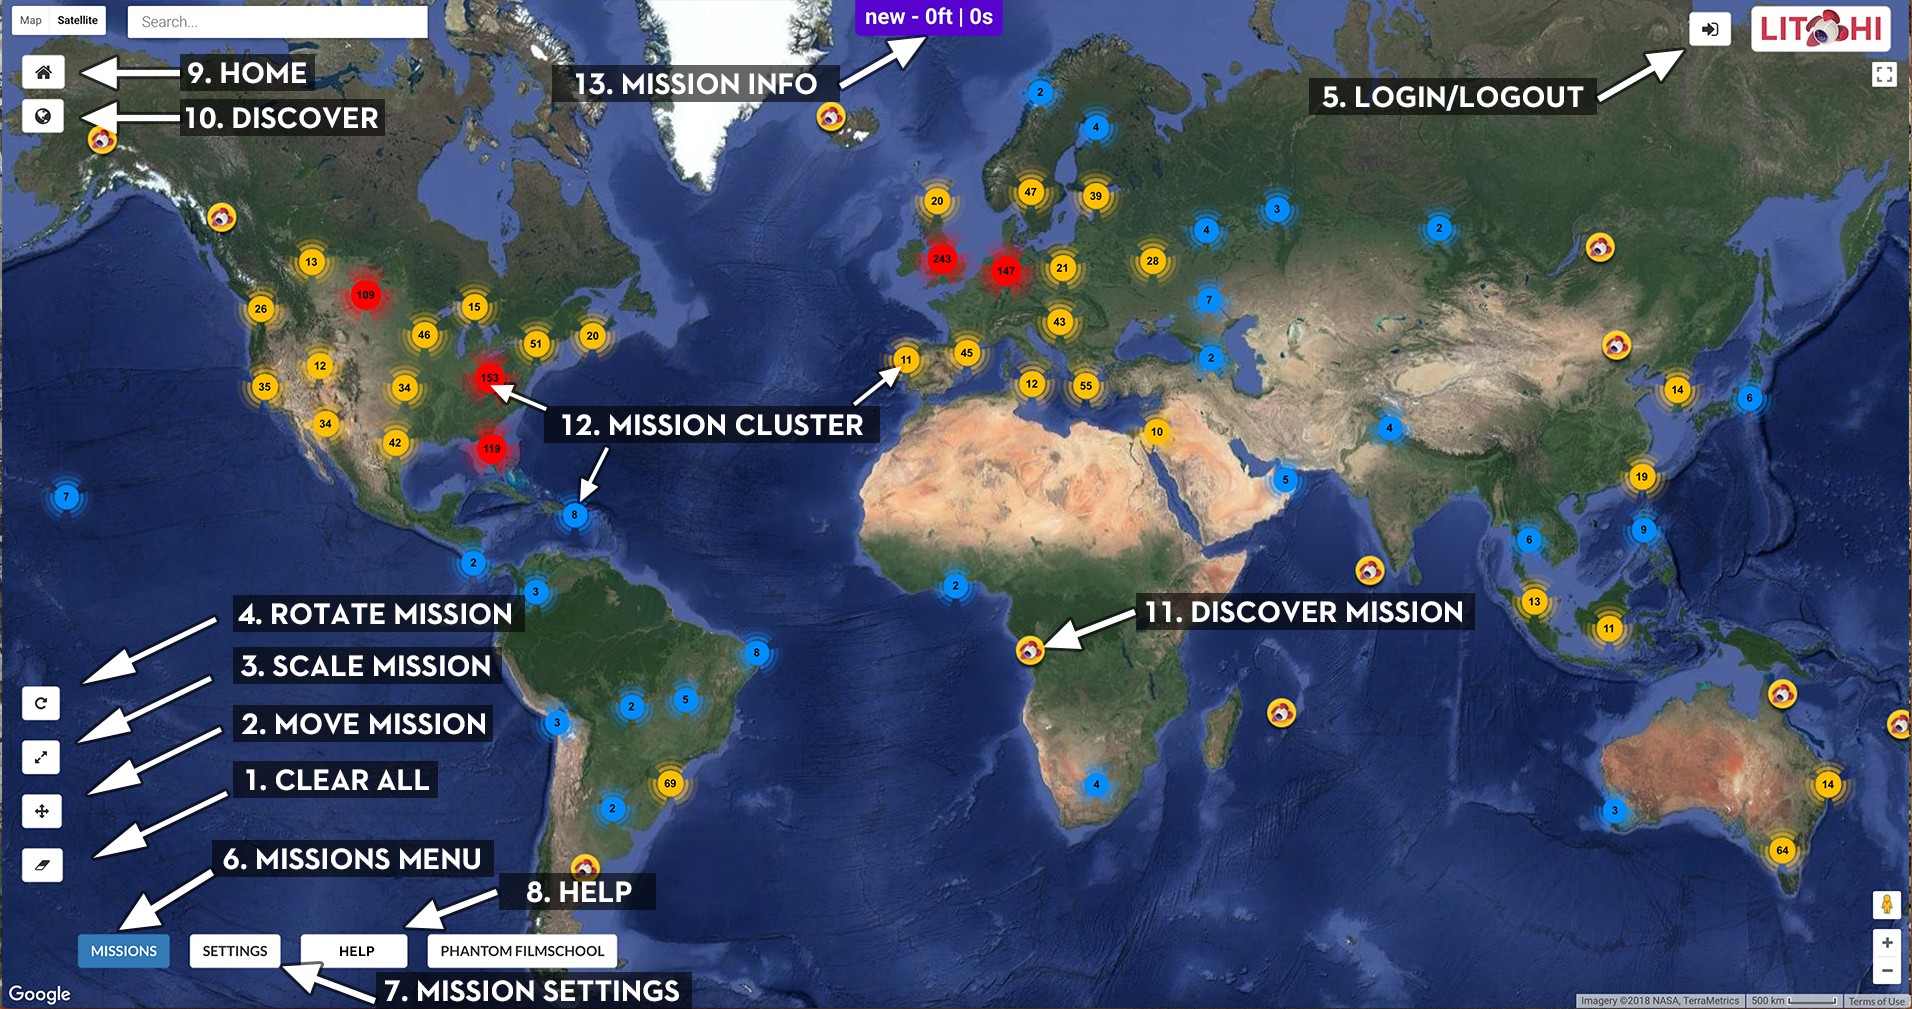
- Clear All: Removes all waypoints and points of interest.
- Move Mission: Click to enable the move tool. Once enabled, you can move the entire mission by dragging any waypoint. Additionally, you can click anywhere on the map to move the mission to that location.
- Scale Mission: Click to enable the scaling tool. Once enabled, you can scale the entire mission by clicking on a waypoint, holding the click and moving the mouse.
- Rotate Mission: Click to enable to rotate tool. Once enabled, you can click anywhere on the map to place the rotation's center. Then, click on any waypoint, hold the click and rotate around the center to rotate the entire mission.
- Login/Logout: Click to login to or logout of your Litchi account. Once logged in, saved missions will automatically synchronize across all devices where you are also logged in.
- Missions Menu: Hover to show the main menu, described in the 'Missions Menu' section below.
- Mission Settings: Click to open the mission settings. These settings are similar to the ones you will find in the mobile Litchi mission planner, please refer to the Waypoint tab to learn more about each setting.
- Help: Click to show useful shortcuts as well as a link to this help page.
- Home: Click to zoom the map to your current location. If the laptop/desktop PC/Mac you use has no GPS sensor, your router will be used to determine your location and it may not be very accurate.
- Globe: Click to fully zoom the map out. This allows quick access to missions around the world.
- Community Mission: Missions from other users which are public and have a video attached to them are shown on the map with a Litchi icon on yellow background. Click on it to load the mission. Double-click on it to watch the attached video.
- Mission Cluster: Mission clusters represent multiple missions in one location, click on it to zoom in closer at that location and see all missions within that cluster.
- Mission Info: Shows the mission's name ('new' when no name) as well as the total distance of the mission and the estimated time it will take to complete.
Missions Menu
- New: Click to create a new mission.
- Open...: Click to open the mission browser. In the mission browser's 'My Missions' tab, you can open your own missions and view/edit them. Attaching a video to a mission and disabling the 'Private' checkbox will make it appear on the map for other users. The mission browser's 'Community' tab lists public missions from other Litchi users.
- Save...: Click to save the current mission. At least 2 waypoints required.
- Import...: Click to import a mission into Mission Hub. Supported file formats are CSV, KML and Litchi Mission files.
- Export as CSV: Click to export the current mission as a CSV file.
- Export as KML 3D Path: Click to export the current mission as a KML file. This can then be imported in Google Earth Pro to view the planned mission in 3D.
Batch Edit
To edit multiple waypoints at once, click on a waypoint to select it and then select more waypoints using control + click.
Altitude Modes

If you enable the "Above Ground" option in the waypoint settings, the altitude you enter will be relative to the ground below the waypoint.
The "Above Ground" option can only be enabled if elevation data is available for the waypoint (see Elevation Data section below).
When "Above Ground" is enabled for a waypoint, the waypoint's icon will show 2 altitudes, the altitude above ground (yellow) and the calculated altitude (white) relative to the take off point which will be the altitude sent to the drone.
Important To calculate these altitudes, it is assumed the first waypoint is in the same location as the take off.
Elevation Data
In order to use the "Above Ground" option to set altitudes, Mission Hub needs to know the ground elevation. There are two possible sources for Elevation Data.
Digital Elevation Model files
Elevation Data can be provided using a Digital Elevation Model (DEM) file. To import a DEM, go to "Missions" then "Import DEM", then select the DEM file on your computer. Mission Hub supports Esri ASCII Grid format (.asc files) with the WGS-84 coordinate system. The area covered by the DEM file will be shown in transparent blue on the map. It is possible to import multiple DEM files.
Online Elevation
To use the Online Elevation data source, enable "Use Online Elevation" in the Mission Hub settings. Elevation data will then be provided for the whole world by our online services.
Visual Mission Planning with Google Earth
Using Google Earth Pro, you have the ability to plan a waypoint mission in 3 dimensions. This enables you to frame your shots easily and to position the camera exactly where you want it for each waypoint.
You can then import the mission into Mission Hub. To learn more about this planning method, please watch the following tutorial video.
Download DJI Cameras - Field of View.kml
Follow
Follow causes the aircraft to follow the movements of a subject.
The subject is usually the mobile device that is connected to the drone but it can also follow a pin on a map or a second mobile device running the Litchi Magic Leash app (Android only).
Warning It is advisable to only use the Follow feature in wide open areas.
Enter the Follow mode by pressing the Flight Mode icon at the top left of the Litchi screen. Select "Follow". Press the Follow Settings icon on the left side of the screen.
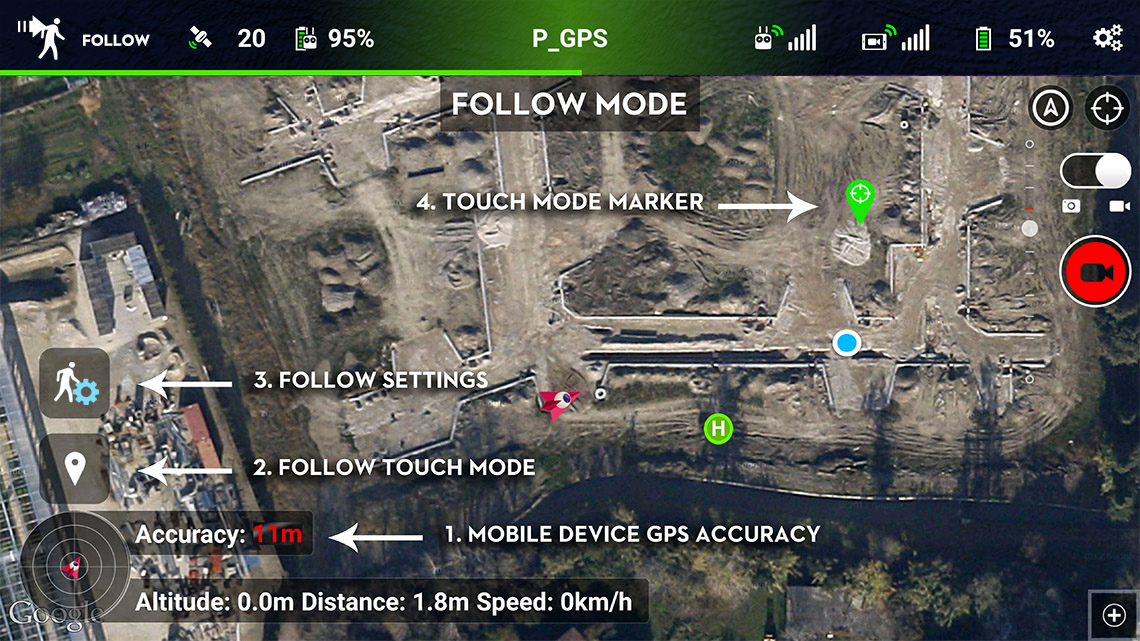
- Mobile Device GPS Accuracy/Altimeter: The estimated accuracy of your mobile device's location, in meters/feet. If this number is red, it means your current location accuracy is over the "Minimum Location Accuracy" general aircraft setting. In such a case, you will not be allowed to start Follow. If you are having difficulties getting a good location accuracy, try another location or increase the "Minimum Location Accuracy" general aircraft setting. Setting the "Minimum Location Accuracy" to a higher value will allow for a bigger margin of error for the mobile device GPS signal, but the follow me movements may be less precise. The altimeter shows the altitude of the mobile device relative to the altitude when Follow is started.
- Follow Touch Mode: Tap to toggle the Follow Touch mode. In this mode, the aircraft will follow the Touch mode marker instead of the mobile device.
- Follow Settings: Tap to display the follow settings (more details below).
- Touch Mode Marker: When the Follow Touch Mode is enabled, tap anywhere on the map to set this marker, which the aircraft will follow. The marker is also draggable.
Follow Settings
For Follow to work, the app needs to know the position of the subject in relation to the aircraft. The easiest way to set these relative values is to fly the aircraft at the relative position the aircraft should be in when the subject begins to move, and press the “Set from Aircraft Position.”
All settings except "Follow Terrain" can be altered in real-time.
- Set from Aircraft Position: Sets the relative altitude, distance and heading from the aircraft's current position.
- Altitude: The altitude from which the aircraft should follow the subject.
- Distance: The distance from which the aircraft should follow the subject.
- Heading Mode (North/Course - North by default): Heading mode “North” means that the aircraft will point its nose to the angle you set relative to North. For example if you set it to 0, the nose will point to North while keeping the subject in the center of the frame. Heading mode “Course” means that the aircraft will point its nose to the angle you set relative to the subject's course (only works if the subject is moving faster than 1m/s). For example if the heading is set to 0 (Leash), the aircraft will follow the subject from behind. Likewise if you set the heading to 180degree (Lead), the aircraft will follow the subject from the front.
- Heading: The angle from which the aircraft should follow the subject (the reference is defined by the Heading Mode).
- Gimbal Control (auto/manual - auto by default): When set to automatic (auto), causes the gimbal to point at the subject automatically. If the option is set to manual, the user will be required to control the gimbal manually.
- Subject Height: The height of the subject that the camera should point at.
- Subject Offset: Only change this setting in situations where you want the aircraft to follow the subject's movements while looking in another direction relative to the subject. The default 0 degrees causes the aircraft to face the subject. An offset of 180 degrees will cause the aircraft to face completely away from the subject.
- Follow Terrain (enabled/disabled - disabled by default): When on, the aircraft will follow the terrain and fly at the altitude set relative to the mobile device elevation which means it will continuously adjust its altitude as the subject moves up or down in altitude (for example if the subject moves up a hill).
- RC Joystick (enabled/disabled - disabled by default): When on, you are able to adjust the altitude using the left joystick up/down, the distance using the right joystick up/down, and the follow heading using the left joystick left/right. The follow heading is the heading of the aircraft relative to the subject, so moving the left joystick to the right and holding it there will result in the aircraft doing an orbit around the subject in a clockwise direction.
- Horizontal Movements (enabled/disabled - enabled by default): When set to off, horizontal movements will be disabled and only the aircraft's altitude, yaw and gimbal will be controlled by Litchi. This can be useful to simulate a fixed camera in the sky.
Running a Follow session
Press the "Follow" button at the bottom of the settings screen to initiate a Follow session. The Follow button will change to a Stop button that can be used to end the Follow session.
When initiated the aircraft will first rise to your chosen altitude, then proceed to the designated relative position as indicated in the settings. It will then move as the subject moves.
Info It is recommended to enable Dynamic Homepoint in the general settings for Follow sessions
Stopping Follow
Stopping a Follow session can be done using the red stop button in the left button bar.
Litchi Magic Leash (Android only)
Download Litchi Magic Leash on the Play Store: https://play.google.com/store/apps/details?id=com.flylitchi.lml
Or Download Litchi Magic Leash on the Apple Store: https://apps.apple.com/gb/app/id1031764016
Litchi Magic Leash allows the subject of the Follow mode to be a different mobile device from that which is connected to the RC. In other words the aircraft will follow a mobile device that is not connected to the RC. Both mobile devices must be connected to the internet for Magic Leash to work.
Warning At this time, Litchi Magic Leash does not transfer altitude data. This means that if you go up or down a hill using Litchi Magic Leash, the aircraft cannot adjust its altitude.
Follow these steps in order to setup Litchi Magic leash (mobile device connected to RC is device A, second device is B):
- On device A, start Litchi, connect to the aircraft, switch to Follow mode, and tap the Magic Leash Button (top left corner of Follow settings) to connect, then remember the PIN code that pops up
- On device B, start Litchi Magic Leash, tap the Magic Leash icon to connect, then enter the PIN code from step 1
- Your two mobile devices are now paired. Start the Follow session on device A.
The following video explains how to use Magic Leash:
Orbit
Orbit causes the aircraft to circle around a point of interest while optionally having the gimbal keeping focus on it.
The orbit parameters (radius, altitude, speed) can be altered in real-time.
Enter the Orbit mode by pressing the Flight Mode icon at the top left of the Litchi screen. Select "Orbit".
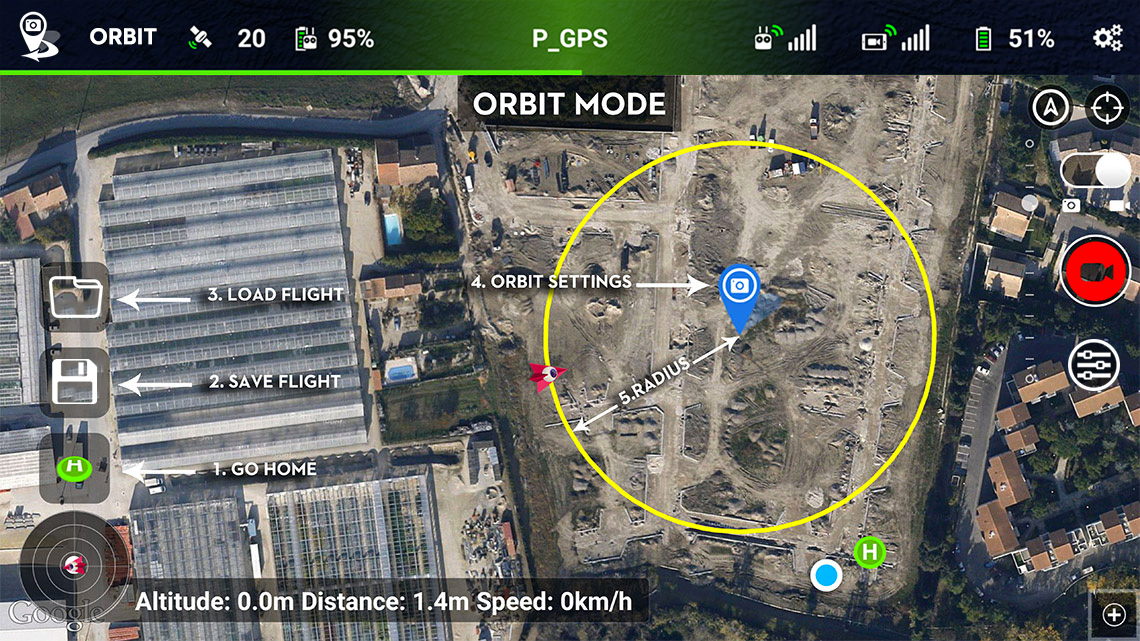
- Go Home (Android only): Tap to initiate Return to Home at any time. Return to Home can also be triggered using the remote controller.
- Save Flight: Tap to save the current Orbit parameters.
- Load Flight: Tap to load a previously saved Orbit flight.
- Orbit Settings: Tap the point of interest marker to bring up the Orbit settings window (details below).
- Radius: The orbit circle is displayed on the map with a yellow line. It is updated in real-time if you change it during an Orbit session.
Orbit Settings
To bring up the Orbit settings window, place a point of interest marker on the map, then tap on it.
- Altitude: The altitude at which the aircraft should orbit. Can be changed in real-time using the left joystick up/down (mode 2).
- Radius: The distance from which the aircraft should orbit from the point of interest. Can be changed in real-time using the right joystick (mode 2). Push the joystick up to reduce the radius, or push it down to increase the radius.
- Speed: The speed at which the aircraft should orbit in degrees per second. The maximum selectable speed will vary depending on the selected radius. Can be changed in real-time using the right joystick (mode 2). Push the joystick to the right to increase the clockwise speed, push it to the left to increase the anti-clockwise speed.
- Entry Point: The point on the circle where the aircraft will start orbiting. Please note that the map is orientated towards North by default.
Important Make sure there are no obstacles between the entry point and the initial position of the aircraft. - Heading Mode: Defines the orientation of the aircraft while orbiting. Can be set to "Center", "Along the circle (Forward)", "Along the circle (Backward)", "Outwards" or "User Controlled (Manual)". The heading can be changed in real-time using the left joystick (mode 2). Push the joystick to the left to turn left, and to the right to turn right.
- Direction (Rotation): Defines the orbit direction, clockwise or anti-clockwise.
- Gimbal Control (auto/manual - auto by default): When set to automatic (auto), causes the gimbal to point at the orbit center automatically. If the option is set to manual, the user will be required to control the gimbal manually.
- Subject Height: The height of the orbit subject that the camera should point at. If Gimbal Control is set to auto, use the RC's gimbal wheel to adjust to subject height during an Orbit session.
Running an Orbit session
Press the "Start" button at the bottom of the settings screen to initiate an Orbit session.
When initiated the aircraft will first rise to the preset altitude, then proceed to the entry point on the Orbit circle. It will then start orbiting.
Stopping Orbit
Stopping an Orbit session can be done using the red stop button in the left button bar.
Virtual Reality
Available in all flight modes, the VR mode immerses you into a real First Person View, the video stream appears right in front of your eyes.
You also have the ability to control the gimbal by moving your head. VR mode requires a remote controller.
Info By harnessing the power of your mobile phone, the VR mode brings you the most immersive FPV experience at less than a quarter the cost of the least expensive FPV glasses solution.
To start VR mode, tap on the goggles icon located the top right corner of the video screen.
The VR mode requires the use of a phone together with external mobile VR goggles. Litchi is compatible with most VR goggles.
Below are some recommendations:
Additionally, if your goggles expose the mobile device camera to the outside, you will be able to take advantage of the mobile device camera toggle in Litchi (except for P3 Standard).
Warning The VR mode brings you into another world, be aware of your surroundings as you will not be able to see your aircraft.
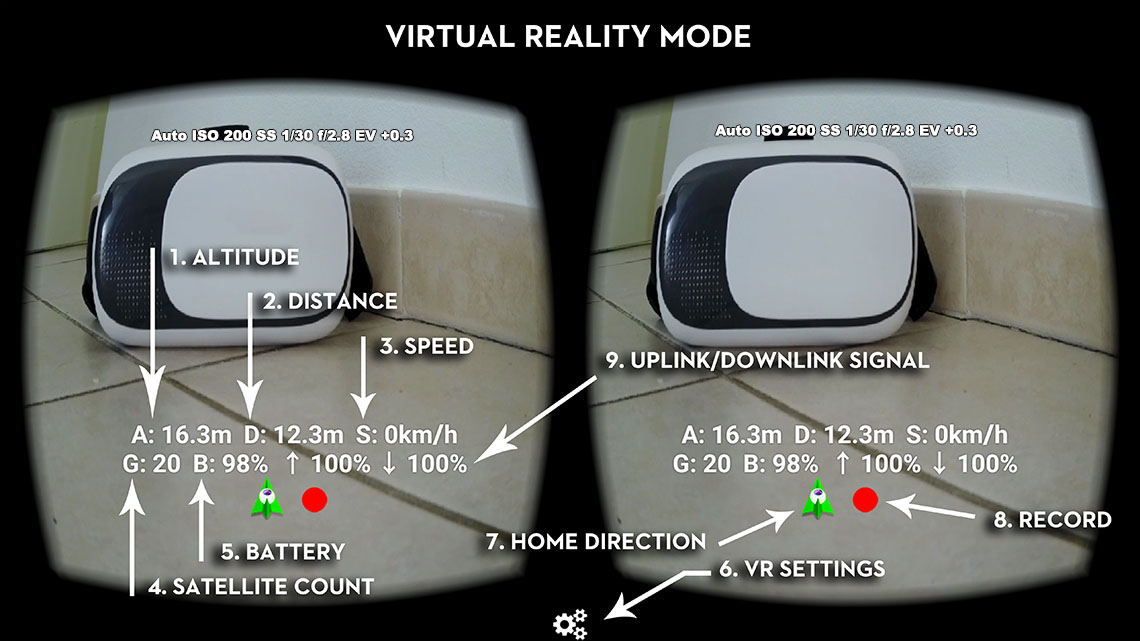
- Altitude: Displays the altitude of the aircraft relative to the elevation where it was powered on.
- Distance: Displays the distance from home point to aircraft. In Follow mode, displays the distance between the mobile device and the aircraft.
- Speed: Displays the current aircraft speed.
- Satellite Count: Shows the number of satellites that the aircraft is locked onto.
- Battery: Shows the remaining aircraft battery percentage.
- VR Settings: Tap to bring up the VR settings (more details below).
- Home Direction: Shows the heading of the aircraft relative to the home point. When this icon points towards the bottom of the screen, it means the aircraft is heading towards the home point.
- Record: This icon will be displayed when the camera is recording video.
- Uplink/Downlink Signal: Displays the uplink and downlink signal strength.
VR Settings
- Exit VR: Tap this button to exit VR mode.
- Display OSD: Turn this on to display the On-Screen Display (altitude, distance, speed, etc.).
- Depth Offset: Increase or decrease the OSD depth offset to make it more comfortable to your eyes.
- Gimbal Head Tracking: Turn this on to enable moving the gimbal using head movements.
- Gimbal Speed: Defines how responsive the gimbal will be to your head movements. A higher value means it will move faster.
- Aircraft Head Tracking: Choose between Off, Immersive or Joystick to enable rotating the aircraft using head movements (details below).
Aircraft Head Tracking
In Immersive mode, rotating your head left/right causes the aircraft to rotate left/right mirroring the angle you are looking at relative to the reference which is established when VR mode is started.
In Joystick mode, rotating your head left/right is similar to using the left joystick's left/right axis (mode 2). As an example, the more you rotate your head to the left, the faster the aircraft will rotate to the left. The zero point, at which the aircraft will not rotate, is set when VR mode starts using the current mobile device orientation at that time.
Mobile Device Camera
For remote controllers with C1/C2 custom buttons (all aircrafts except P3 Standard), you can bind the custom function "Toggle Mobile Device Camera (VR)" to either C1 or C2.
This allows you to switch between your drone's camera view and your mobile device's camera view, making it very easy to keep track of your surroundings with the goggles on.
Focus
Focus allows you to easily keep a subject (Point of Interest or Mobile Device) in the video frame while flying the aircraft manually.
The aircraft rotation (yaw) and gimbal pitch angle are controlled by Litchi as well as the gimbal yaw for drone models that support it.
Focus is compatible with Litchi Magic Leash (Android only), making it possible to focus on an external mobile device.
Enter the Focus mode by pressing the Flight Mode icon at the top left of the Litchi screen. Select "Focus".
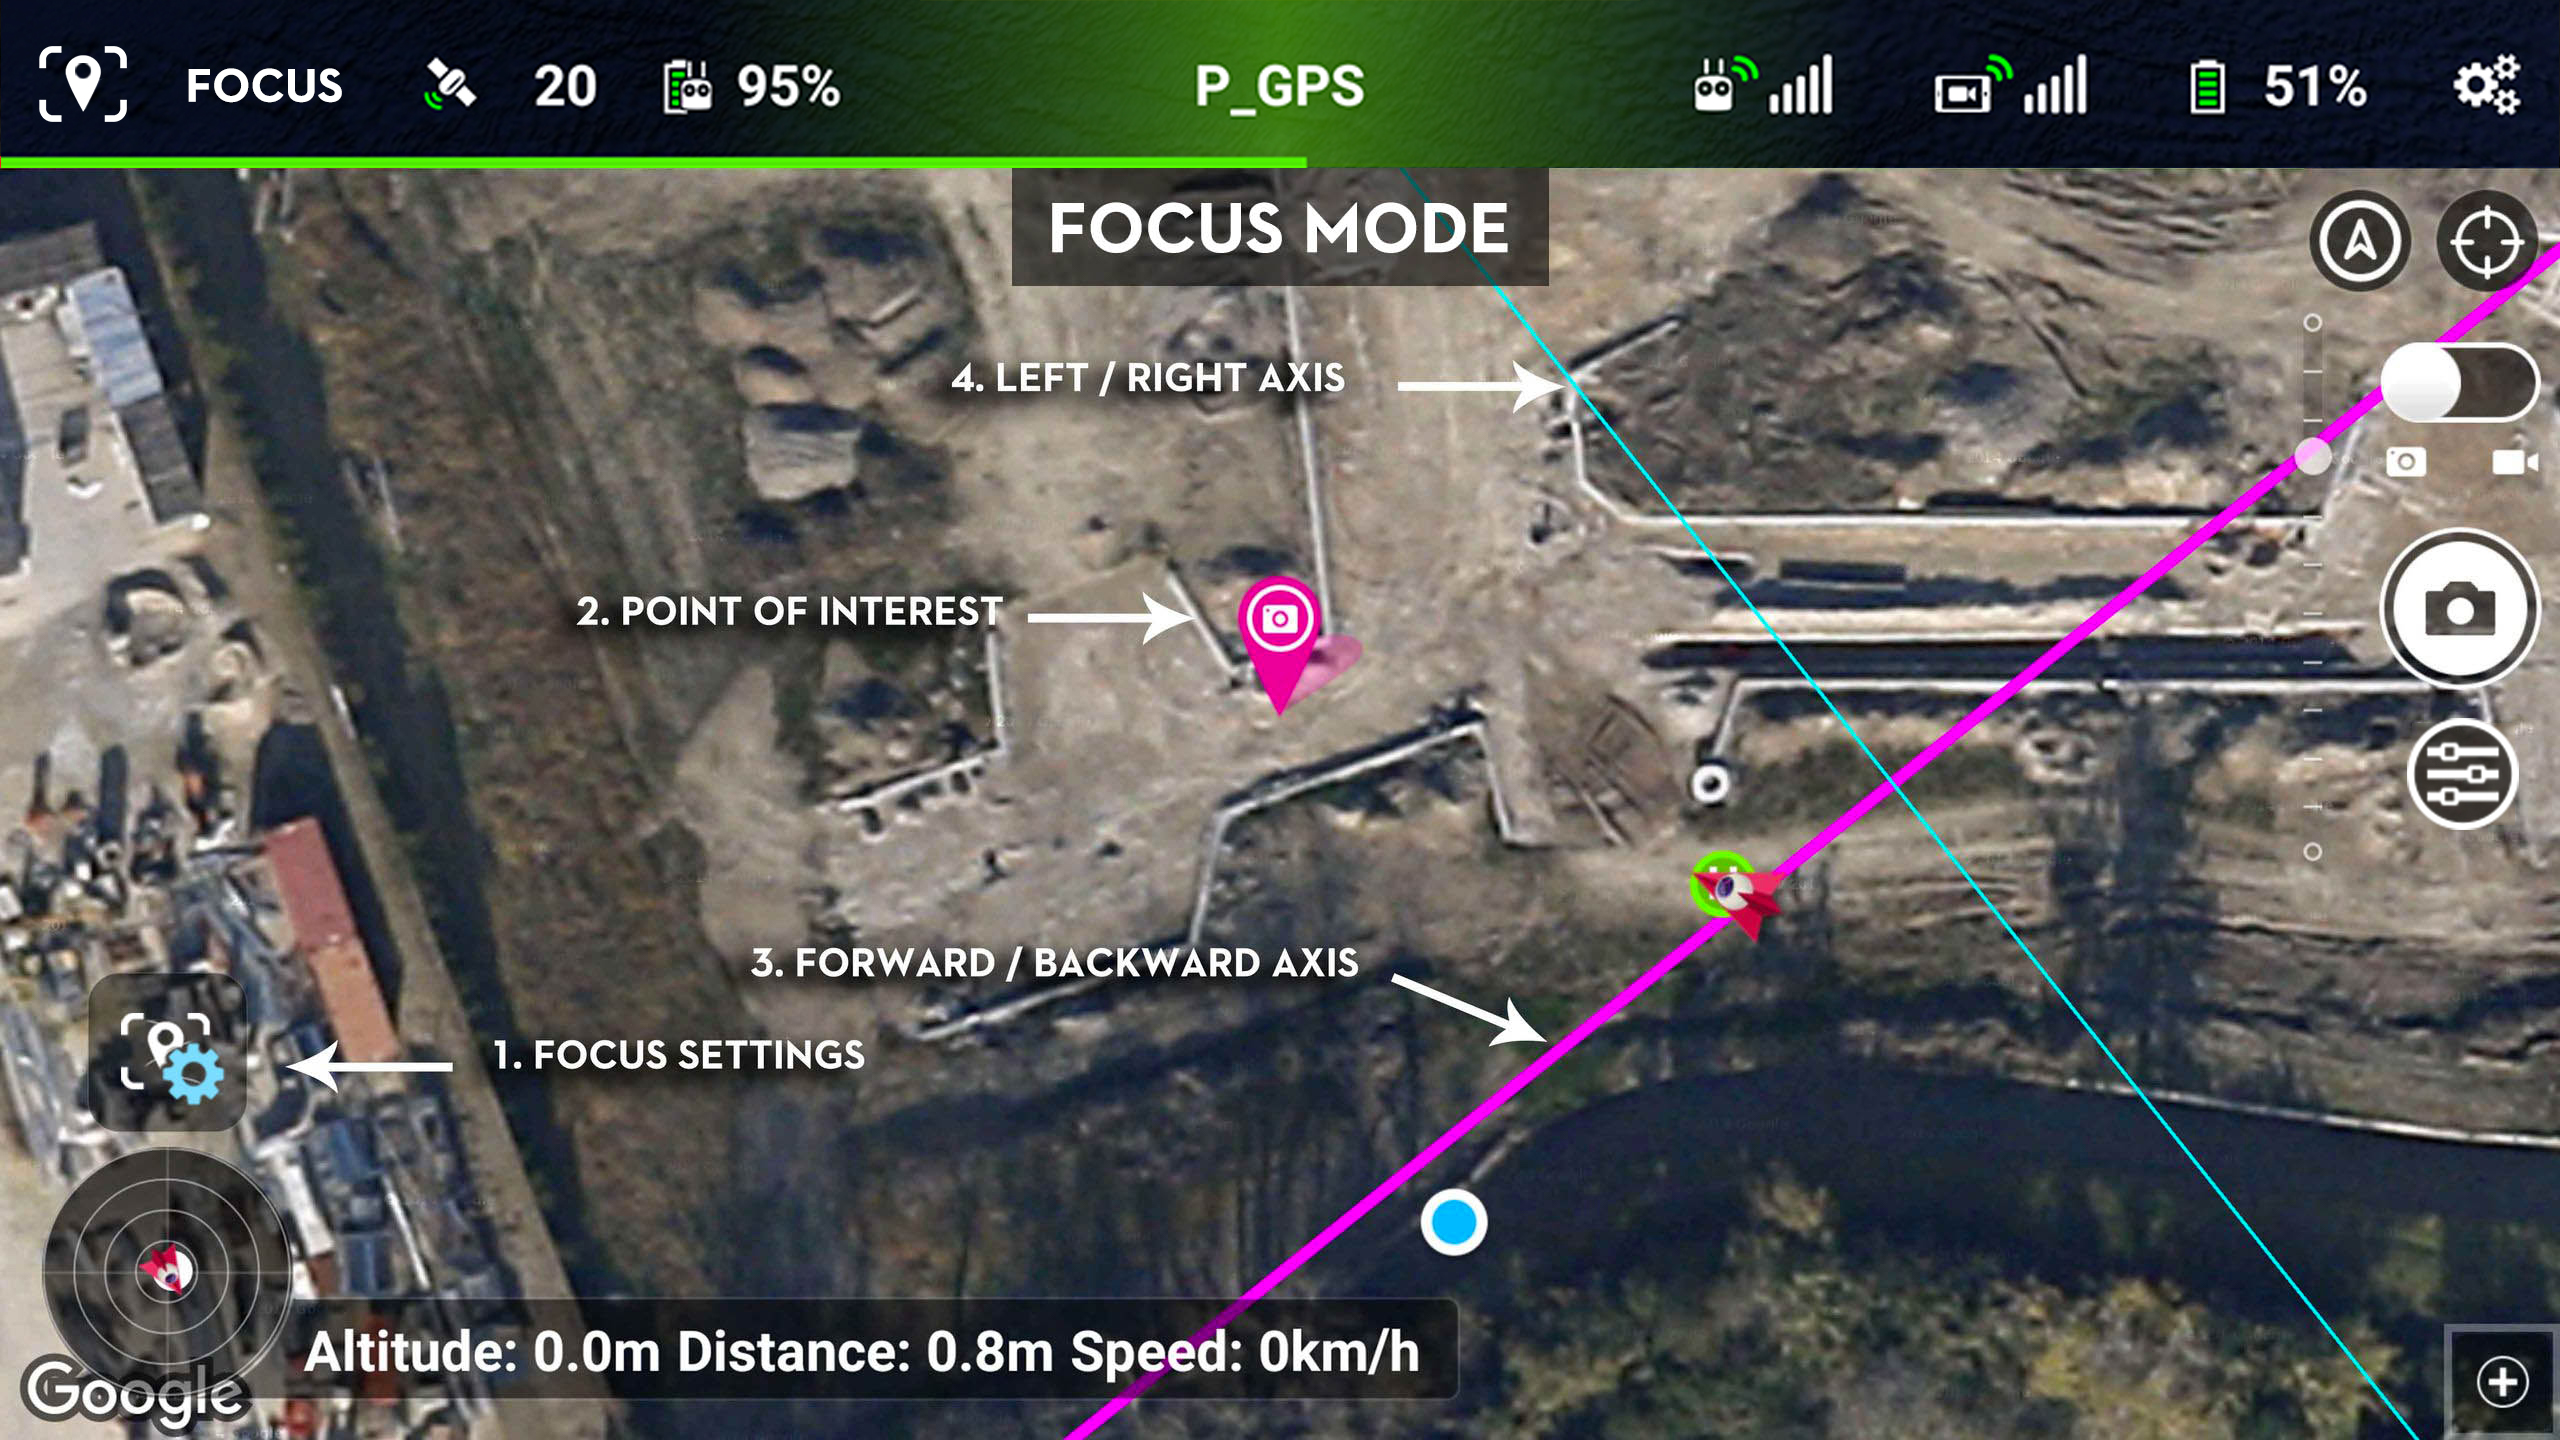
- Focus Settings: Tap to bring up the Focus settings window (details below).
- Point of Interest: The point of interest marker.
- Forward/Backward Axis: Represents the "Joystick Reference" pitch axis along which the aircraft course is locked. Shown when "Aircraft Rotation" is enabled and a custom "Joystick Reference" is selected.
- Left/Right Axis: Represents the "Joystick Reference" roll axis along which the aircraft course is locked. Shown when "Aircraft Rotation" is enabled and a custom "Joystick Reference" is selected.
Focus Settings
- Subject: Choose between Point of Interest (to be placed on the map) or Mobile Device.
- Subject Height: The height of the subject that the camera should point at. You can also use the RC's gimbal wheel to adjust to subject height while in flight.
- Aircraft Rotation: When enabled, Litchi will control the yaw (rotation) of the aircraft. Recommended for drones which do not support gimbal yaw rotation.
Warning There is added latency with joystick controls when this setting is enabled, use carefully. - Joystick Reference: Choose between "Default" (joysticks respond as normal), "Aircraft Heading" (course is locked based on current aircraft heading, similar to Course Lock, can be changed in real-time using the yaw joystick and can be reset using C1/C2 "Course Lock" custom function), "Mobile Device Orientation/Device Heading" (course is locked based on your mobile device orientation), "Home-Aircraft (H-A) Bearing" (course is locked based on the bearing between the home point and the aircraft location) and "Mobile Device-Aircraft (D-A) Bearing" (course is locked based on the bearing between the mobile device and the aircraft location). For each option except "Default", axes will be drawn on the map for reference, the large magenta axis is the pitch axis (forward/backward) while the small blue axis is the roll axis (left/right). Only applies when Aircraft Rotation is enabled.
- Joystick Speed Limiter: Use this setting to slow down the overall speed of the aircraft. Only applies when Aircraft Rotation is enabled.
Running a Focus session
If your subject is a Point of Interest, place it on the map before starting the session.
Then, press the "Start" button at the bottom of the settings screen to initiate a Focus session.
Stopping Focus
Stopping a Focus session can be done using the red stop button in the left button bar.
Litchi Magic Leash (Android only)
Download Litchi Magic Leash on the Play Store: https://play.google.com/store/apps/details?id=com.flylitchi.lml
Or Download Litchi Magic Leash on the Apple Store: https://apps.apple.com/gb/app/id1031764016
Litchi Magic Leash allows the subject of the Focus mode to be a different mobile device from that which is connected to the RC. In other words the aircraft will focus on a mobile device that is not connected to the RC. Both mobile devices must be connected to the internet for Magic Leash to work.
Follow these steps in order to setup Litchi Magic leash (mobile device connected to RC is device A, second device is B):
- On device A, start Litchi, connect to the aircraft, switch to Focus mode, and tap the Magic Leash Button (top left corner of Focus settings) to connect, then remember the PIN code that pops up
- On device B, start Litchi Magic Leash, tap the Magic Leash icon to connect, then enter the PIN code from step 1
- Your two mobile devices are now paired. Start the Focus session on device A.
Panorama
The Panorama mode allows you to easily shoot horizontal, vertical and spherical panoramas.
Enter the Panorama mode by pressing the Flight Mode icon at the top left of the Litchi screen. Select "Panorama".
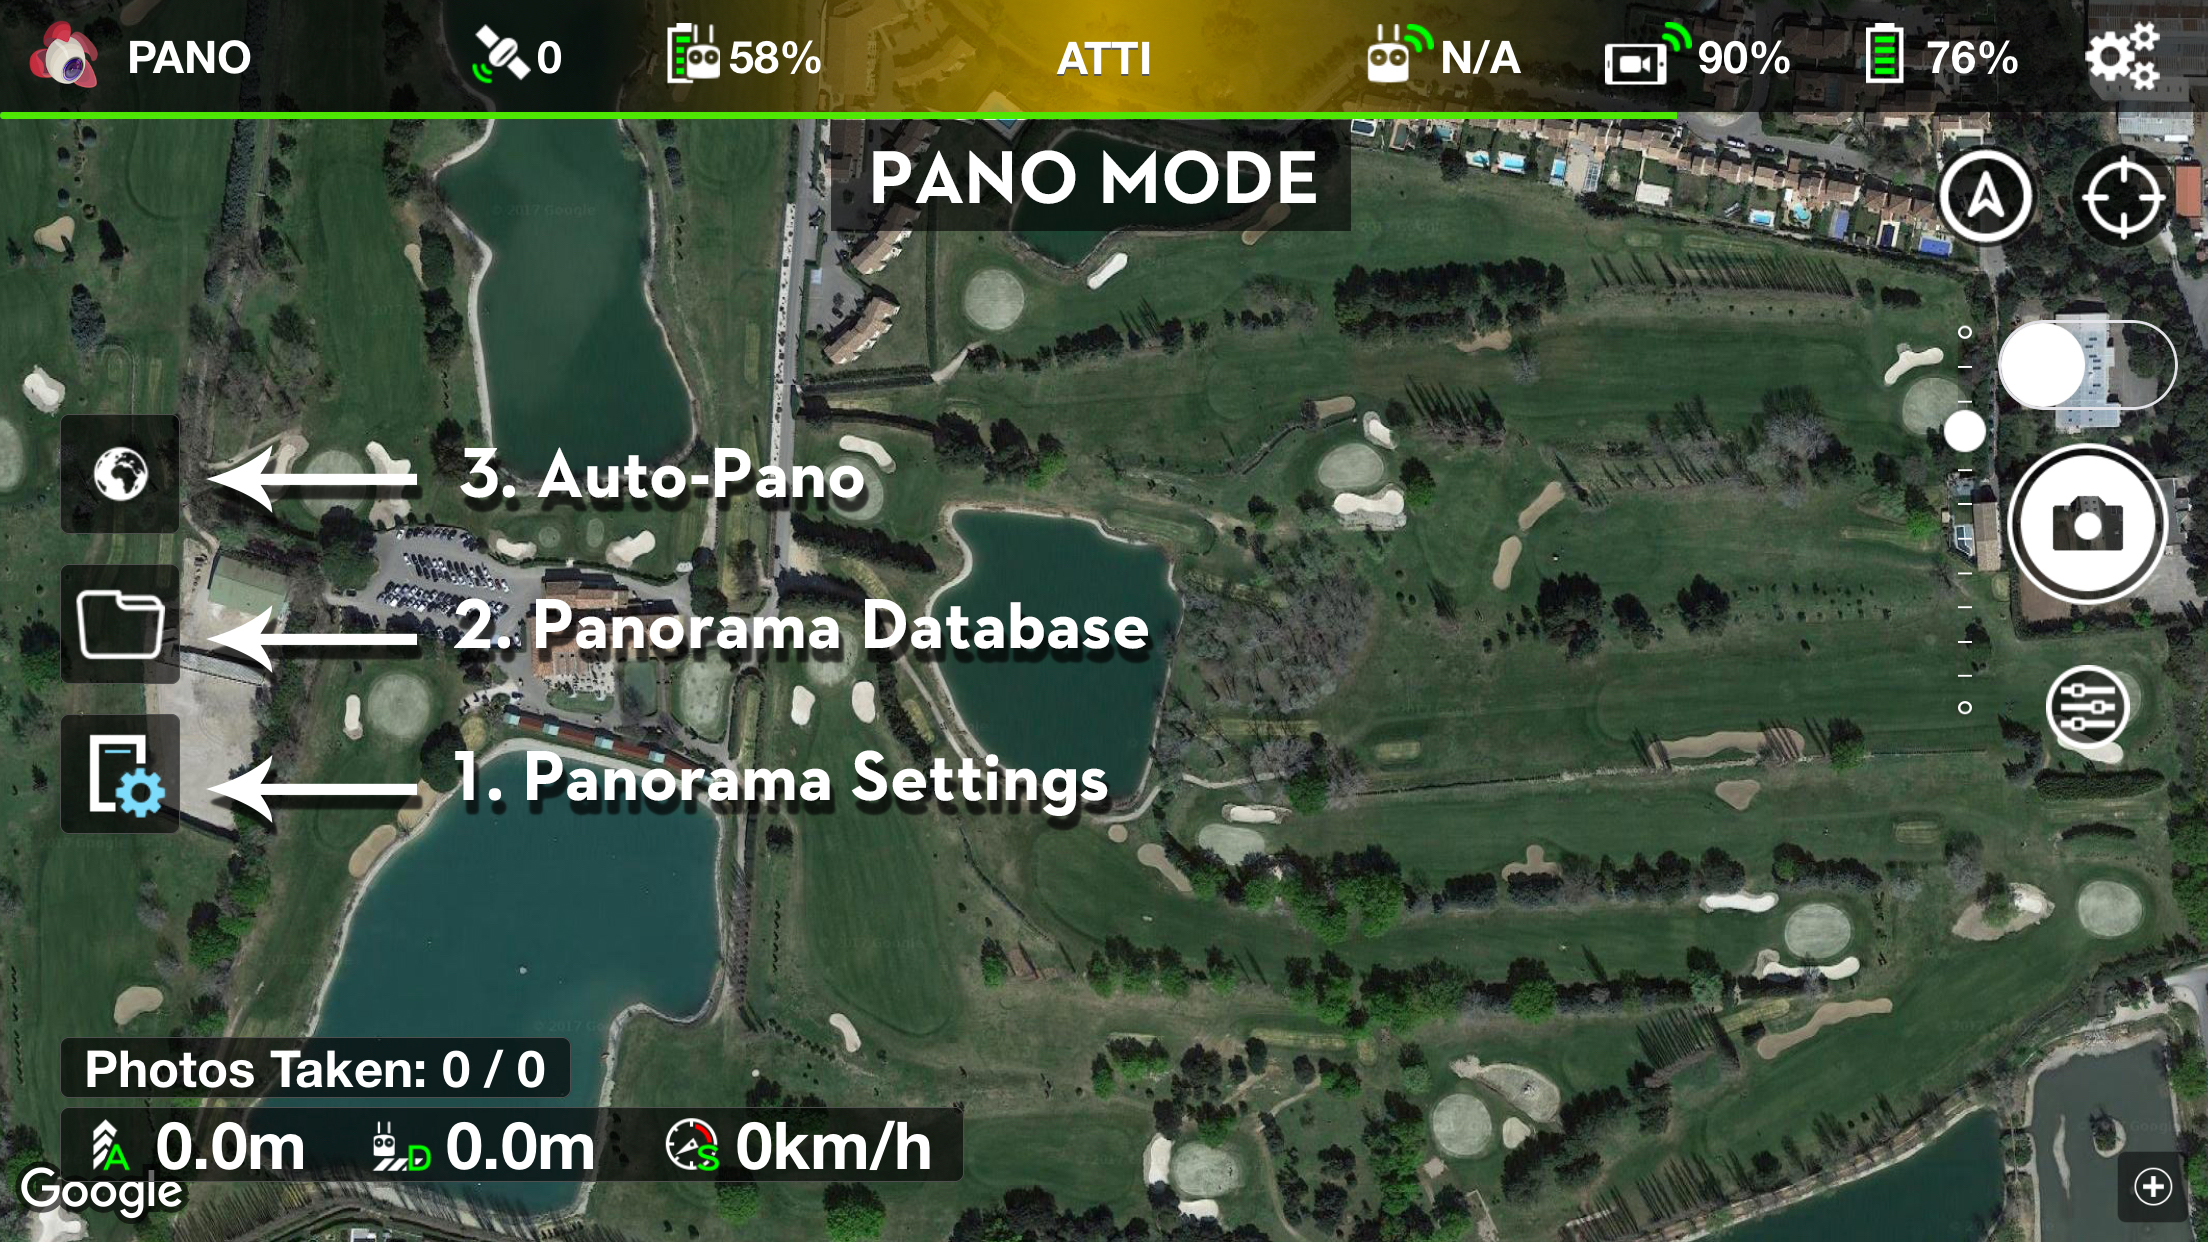
- Panorama Settings: Tap to bring up the Panorama settings window (details below).
- Panorama Database: Tap to show the Panorama Database which lists all your panoramas (iOS only - details below).
- Auto Pano: Tap to start an Auto Pano.
Panorama Settings
- Width: The width of the panorama in degrees.
- Columns: The width is divided in columns which define the aircraft/gimbal yaw angles where photos are taken.
- Height: The height of the panorama in degrees. The height will be centered on the gimbal's pitch when starting the panorama. If the 'Nadirs' setting is set to 1 or more, the height of the panorama will be clamped to the bottom of the panorama. For example: with 'Height' set to 40° and 'Nadirs' set to 0, the panorama will be shot from -20° to +20° (assuming the gimbal is at 0° at the beginning of the panorama); with 'Height' set to 90° and 'Nadirs' set to 1, the panorama will be shot from -90° to +0°.
- Rows: The height is divided in rows which define the gimbal pitch angles where photos are taken.
- Nadirs: The number of Nadirs (bottom shots) that will be taken. If the 'Width' is set to less than 360° or if 'Columns' is set to 1, no 'Nadirs' shots will be taken.
- Grid Pattern: Choose between 'Linear' and 'Spherical'. In 'Linear' mode, the 'Columns' setting applies to each row (for example in a 8 'Columns' x 4 'Rows' panorama, the drone will take 8 photos for each one of the 4 rows). In 'Spherical' mode, the 'Columns' setting applies to the horizon row only (+0°). Less photos will be taken at lower and higher rows, reducing the total number of photos taken while still producing a stitchable output.
- Capture Strategy: Choose between 'Column by Column' and 'Row by Row'.
- Mode: Choose between 'Aircraft Rotation' and 'Gimbal Rotation'. This setting is only available for gimbals which are able to yaw (e.g. Inspire 1-2). If 'Gimbal Rotation' mode is selected, the gimbal will rotate instead of the aircraft.
- Delay before each Photo: Additional time that the aircraft waits before taking each photo, can help to stabilize shots.
- Delay after each Photo: Additional time that the aircraft waits after taking each photo, can help to stabilize shots.
- Save to Panorama Database: Choose 'Yes' to save this panorama to the Panorama Database (details below). iOS only.
Shooting a Panorama
Fly the aircraft to the location you want to take the panorama, then press the "Start" button at the bottom of the settings screen to initiate the shot.
Stopping Panorama
Stopping a Panorama shot can be done using the red stop button in the left button bar.
Auto Pano
Auto Pano uses preset parameters to shoot a 360° spherical panorama.
In addition, Litchi will use optimized camera settings and panorama settings to improve the chances of a successful stitch in Litchi's Panorama Database (iOS only).
Info If you use a camera which has variable focus, make sure to set the focus before starting the Auto Pano.
Panorama Database (iOS only)
The Panorama Database lets you stitch, view and share the panoramas you have shot all within Litchi.
The Panorama Database is not automatically backed up or synced, as such be aware that uninstalling Litchi will also permanently delete the Panorama Database.
After selecting a panorama in the database, select the desired stitching quality and tap on "Create Panorama" to stitch it within Litchi.
Warning Avoid stitching a panorama while the drone is in the air as the stitching process can take a while and uses a lot of resources.
There are 3 available quality settings for stitching:
- Low: Uses the preview images automatically downloaded by Litchi after a panorama is shot. Can be done without downloading the high quality images from the drone but produces a lower quality panorama.
- Medium: Requires downloading the high quality images from the drone to produce a higher quality panorama. Up to 65 megapixels on iPhone and up to 100 megapixels on iPad Pro.
- High: Requires downloading the high quality images from the drone to produce an even higher quality panorama. Up to 130 megapixels on iPhone and up to 220 megapixels on iPad Pro.
To improve the chances of a successful stitch, please follow these steps:
- Use the Auto Pano feature, which will optimize the camera and panorama settings
- Avoid starting the Panorama shot with the drone facing the sun
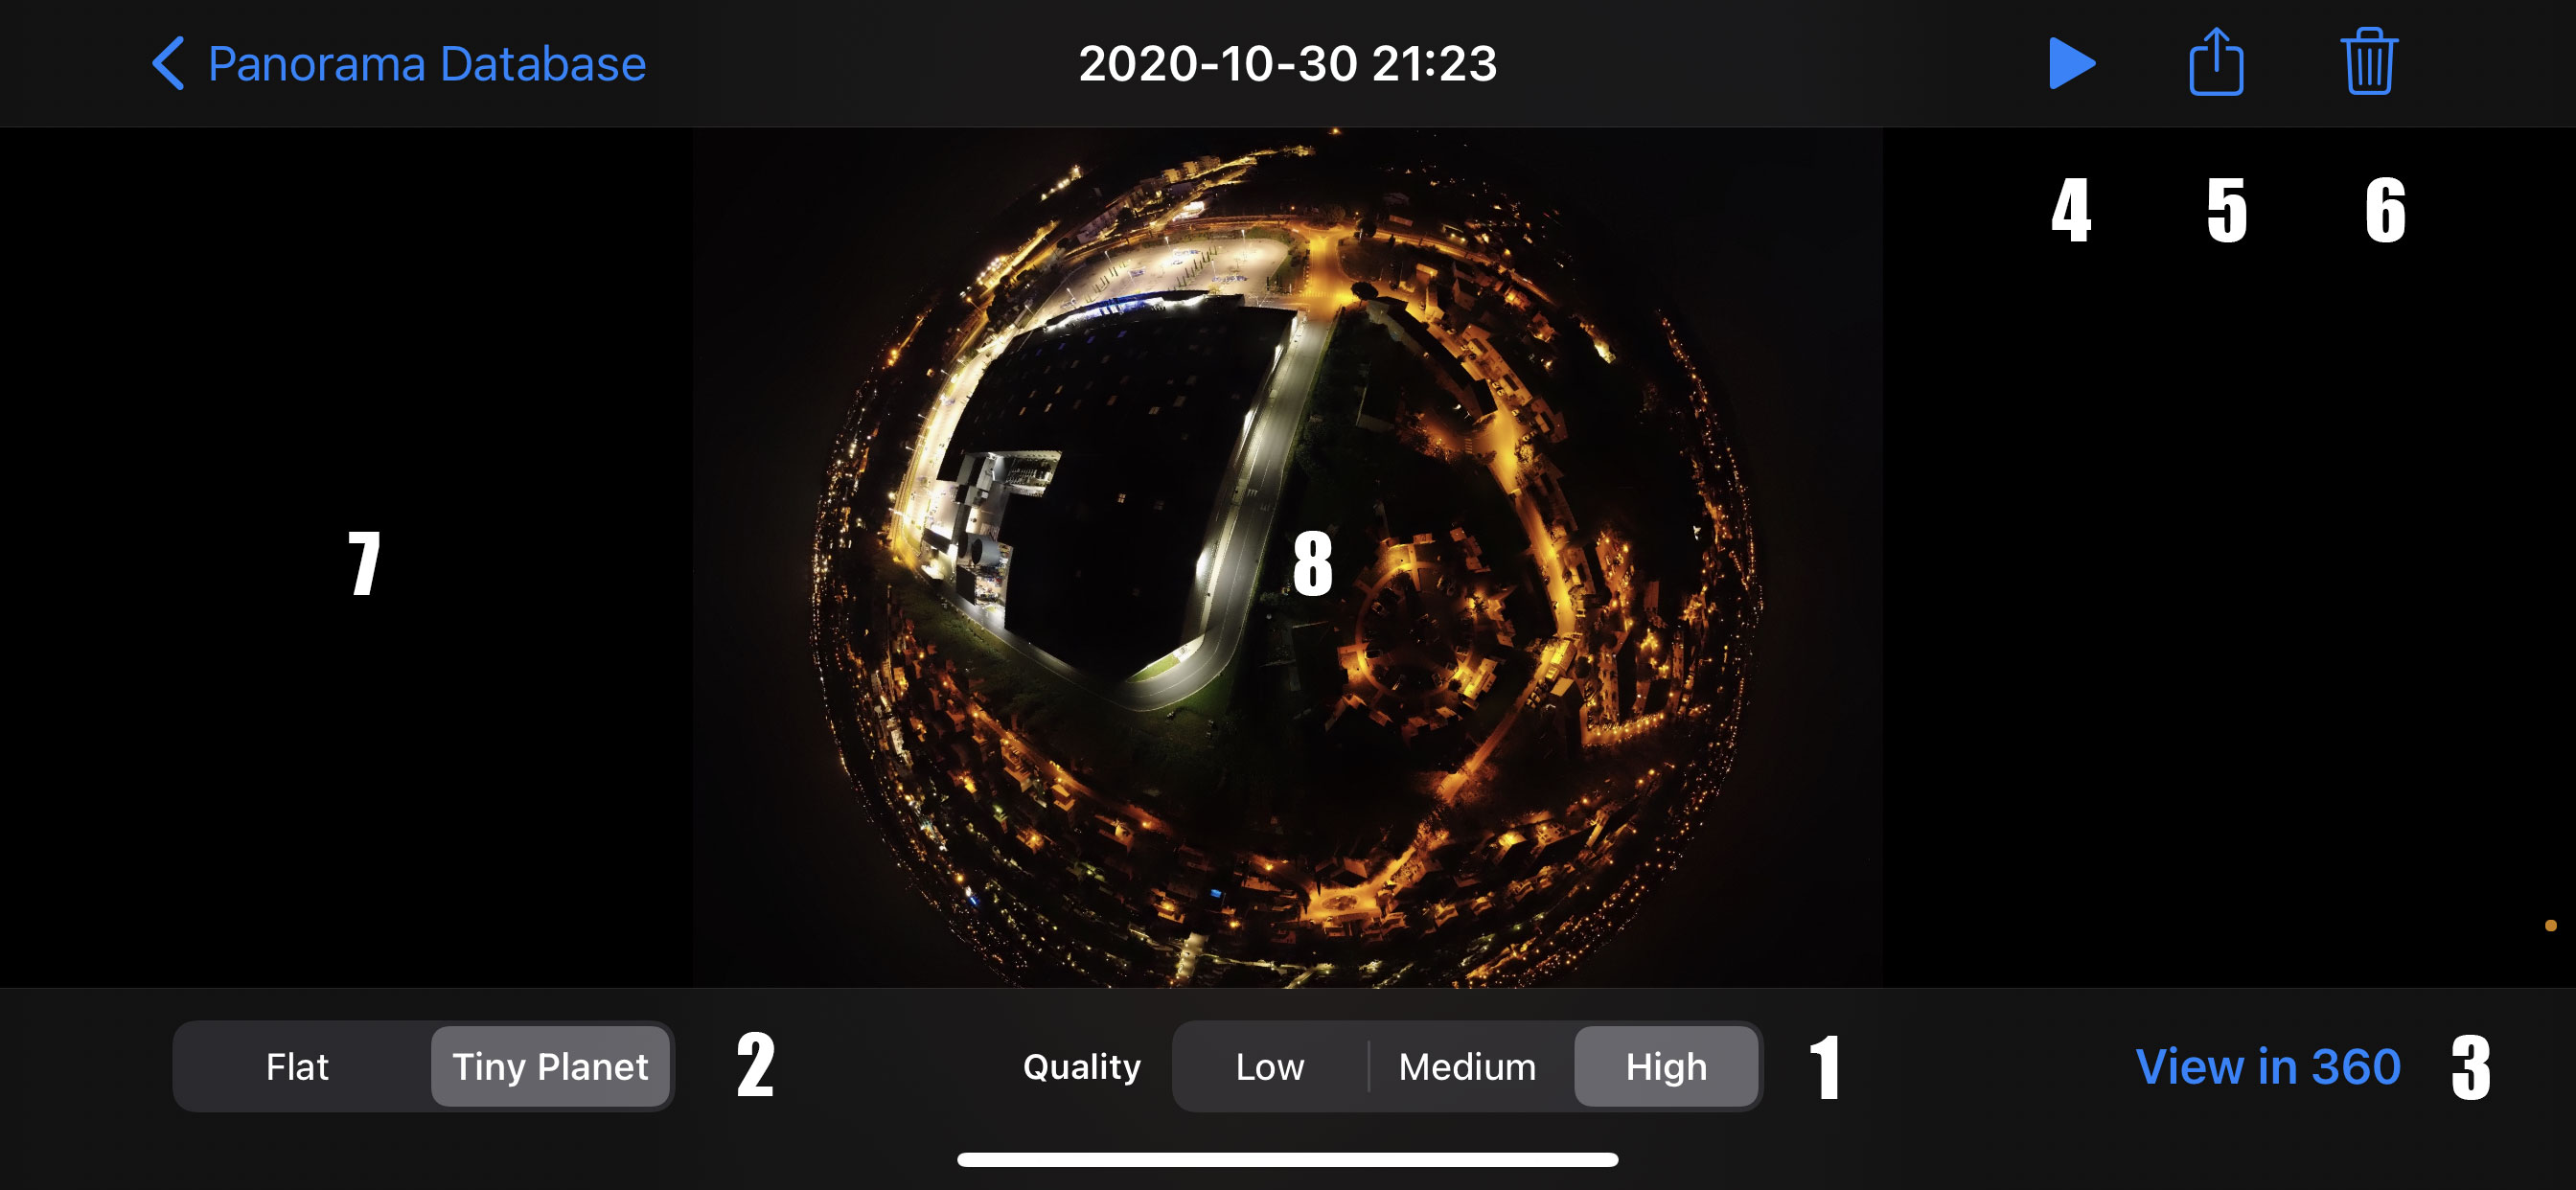
- Quality: Select the panorama stitching quality.
- Flat/Tiny Planet: Switch between equirectangular and tiny planet projections.
- View in 360: Tap to view the panorama in 3D.
- Delete: Tap to delete this panorama.
- Share: Tap to share the panorama. 360 panoramas will be shared in a spherical viewer if the recipient supports it (e.g. Facebook). For the best quality with 360 panoramas, it is suggested to save the pano to your device, then share it using the Google Photos app which supports spherical view.
- Export Movie: In tiny planet mode, tap to export a movie of the tiny planet rotating. After exporting it, you will be able to share it.
- Browse Panorama Photos: In equirectangular mode, swipe left/right to browse through the panorama's photos.
- Zoom/Rotate: Use the pinch to zoom gesture to zoom an image. In tiny planet mode, you can also rotate the image using circular finger motions.
Stitching a Panorama outside of Litchi
Here is a non-comprehensive list of software you can use to stitch the photos together outside of Litchi:
Track
In Track mode, Litchi uses state of the art computer vision algorithms to track a selected object on the video preview and keep it in the frame.
You have the choice to either fly the aircraft manually while Litchi keeps the object in the frame,
use the Orbit feature to instruct the aircraft to Orbit around the tracked object, or start Follow where the drone will autonomously follow the tracked object.
The aircraft rotation (yaw) and gimbal pitch angle are controlled by Litchi as well as the gimbal yaw for drone models that support it.
Enter the Track mode by pressing the Flight Mode icon at the top left of the Litchi screen. Select "Track".
Warning Because Litchi decodes the video, runs the algorithms to track the object and renders the video, all of this in real-time, a high performance mobile device is required. Be sure to close all background applications and screen recorders before using Track. Video lag will kill tracking.
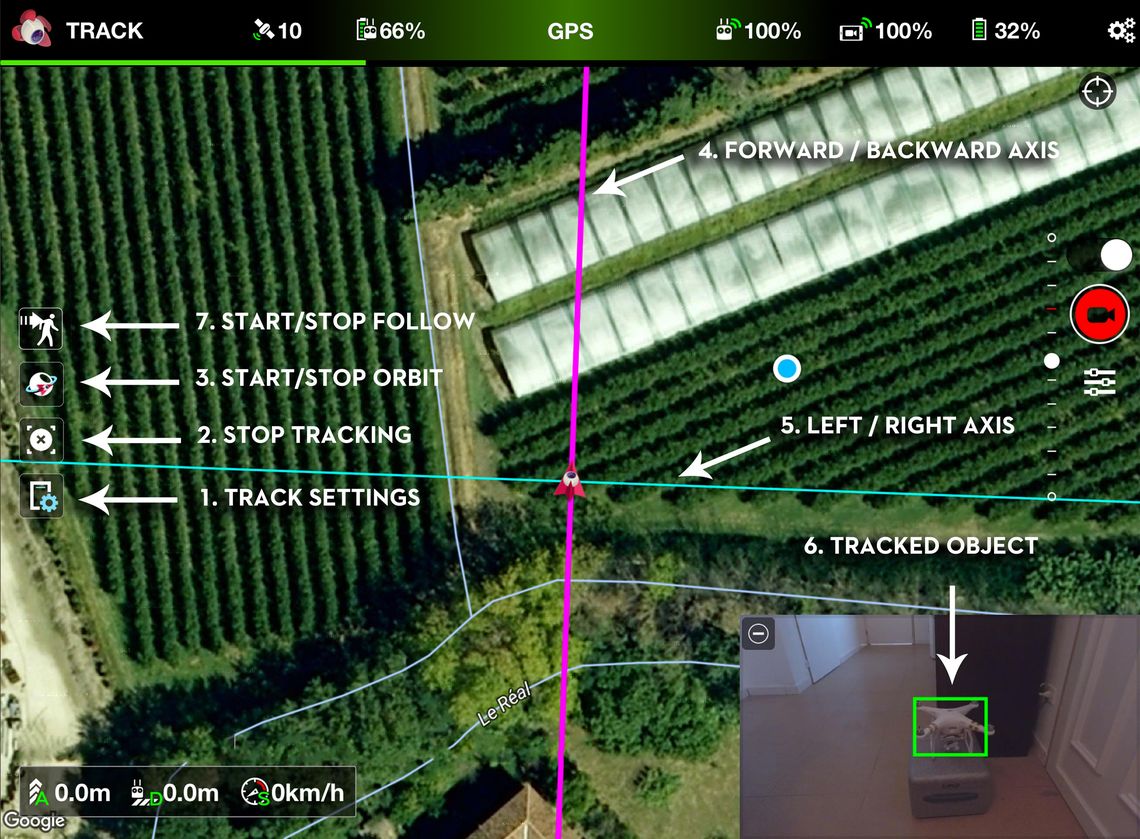
- Track Settings: Tap to bring up the Track settings window (details below).
- Stop Tracking: Tap to stop the current Track session.
- Start/Stop Orbit: Tap to start or stop an autonomous Orbit around the tracked object. The speed at which the aircraft will orbit can be changed in the Track settings.
- Forward/Backward Axis: Represents the "Joystick Reference" pitch axis along which the aircraft course is locked. Shown when "Aircraft Rotation" is enabled and a custom "Joystick Reference" is selected.
- Left/Right Axis: Represents the "Joystick Reference" roll axis along which the aircraft course is locked. Shown when "Aircraft Rotation" is enabled and a custom "Joystick Reference" is selected.
- Tracked Object: A green rectangle around the object means Litchi is confident it is tracking the correct target, an orange rectangle indicates less confidence, a red rectangle indicates a very low confidence.
- Start/Stop Follow: Tap to start or stop an autonomous Follow.
Track Settings
- Tracking Quality: Choose between Normal or High for the tracking quality. When set to High, the tracking will be more accurate and reliable but it uses more resources which can cause lag on older devices. Only set to High when using a powerful mobile device (iPad Pro, latest iPhones, etc).
- Aircraft Rotation: When enabled, Litchi will control the yaw (rotation) of the aircraft. Recommended for drones which do not support gimbal yaw rotation.
Warning There is added latency with joystick controls when this setting is enabled, use carefully. - Joystick Reference: Choose between "Default" (joysticks respond as normal), "Aircraft Heading" (course is locked based on current aircraft heading, similar to Course Lock, can be changed in real-time using the yaw joystick and can be reset using C1/C2 "Course Lock" custom function), "Mobile Device Orientation/Device Heading" (course is locked based on your mobile device orientation), "Home-Aircraft (H-A) Bearing" (course is locked based on the bearing between the home point and the aircraft location) and "Mobile Device-Aircraft (D-A) Bearing" (course is locked based on the bearing between the mobile device and the aircraft location). For each option except "Default", axes will be drawn on the map for reference, the large magenta axis is the pitch axis (forward/backward) while the small blue axis is the roll axis (left/right). Only applies when Aircraft Rotation is enabled.
- Joystick Speed Limiter: Use this setting to slow down the overall speed of the aircraft. Only applies when Aircraft Rotation is enabled.
- Orbit Speed: Controls the speed of the autonomous Orbit around the tracked object.
Running a Track session
Select the object you wish to track on the video preview using the Pinch gesture (with 2 fingers, see image below).
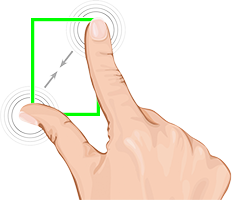
When you are happy with the selection, release your fingers from the screen and Track will automatically start.
It is recommended to start Track while the aircraft is airborne.
To select a different object, simply start the procedure again.
Info To recenter the current selection, double tap where you want the new object center to be on the video preview.
For optimal tracking, ensure the background scene is not too cluttered and that there is enough contrast between the tracked object and its surroundings.
It is also important to select your object carefully. Avoid including too much of the background in the selection and make sure the object you want to track is not too small on the video preview.
Orbit
During a Track session, you can start an Orbit using the Start Orbit button in the left button bar.
The speed at which the aircraft will orbit can be changed in the Track settings.
Additionally, while Orbit is in progress it is possible to control the aircraft's altitude, pitch and increase/decrease the Orbit speed using the joysticks.
Follow
In Follow mode, Litchi takes entire control of the drone to have it follow the tracked object. The maximum aircraft speed in this mode is 10m/s.
It is possible to control the altitude of the drone while Follow is in progress using the joysticks.
For an optimal Follow, avoid selecting an object that is horizontally or vertically aligned with the drone's field of view.
Follow should not be used where the terrain has elevation changes as the aircraft will not adjust its altitude should the tracked object change altitude.
Warning Under non-optimal conditions, Litchi may fail to keep track of the object causing the aircraft to follow an unwanted path. Always be ready to intervene and regain control using the remote controller mode switch or the "Stop Tracking" button.
Stopping Track
Stopping a Track session can be done using the "Stop Tracking" button in the left button bar.
Settings
Info Not all settings apply to both platformsGeneral
- Units: Use to switch between Metric or Imperial units.
- Map Engine: Use to switch the map engine used by Litchi.
- Map Type: Use to switch between Standard (no imagery), Satellite (imagery), Terrain (topographic) and Hybrid (imagery + street names).
- Map Auto Zoom: Enable/disable map auto zoom.
- Map Safe Area Radius: When not 0, a red circle will be drawn on the map to represent a safe distance area. This is only a visual help and will not limit you in any way should you wish to go out of the bounds of this circle. Android only.
- Show GEO Warning Zones: Show/hide GEO Enhanced Warning and Warning zones on the map. iOS only.
- Use Amap Imagery (for China Mainland): To be used in conjunction with the "Calibrate Map for China Mainland" setting. When the map is calibrated, Google's imagery will not map to their true location, enable this setting to fix it. iOS only.
- Calibrate Map for China Mainland: If you are in mainland China, enable this setting to get correct GPS coordinates on the map. iOS only.
- Show Home Orientation: When enabled shows a line between the home point and the aircraft on the map.
- Show GPS Coordinates: When enabled, shows the current latitude and longitude of the aircraft next to the altitude, distance and speed indicators at the bottom left of the screen. In addition, when enabled this setting allows you to edit waypoint coordinates in Waypoint mode.
- GPS Coordinates Format: Changes the format in which GPS coordinates are shown when Show GPS Coordinates is enabled. Available formats: Decimal Degrees, Decimal Minutes, Degrees Minutes Seconds and UTM.
- Show VPS Height when Used: When this setting is enabled and when the Visual Positioning System is active (5m or less above the ground), the more precise ultrasonic height will be shown instead of the barometric altitude.
- Show Battery Voltage: When enabled, shows the lowest aircraft battery cell voltage under the battery percentage.
- Sync Local Missions: When enabled, and provided you are logged in to your Litchi account, missions created on the device will be synced to the cloud so you can access them on other devices.
- RTMP Live Streaming Bitrate: Select a bitrate for RTMP Live streaming. A lower bitrate may help if you have a slow connection.
- RTMP Live Streaming Buffer Time: Select a buffer time for RTMP Live streaming. A longer buffer time may help to avoid skipping in case of short connection loss. iOS only
- Litchi Vue Streaming Bitrate: Select a bitrate for Litchi Vue Live streaming. A lower bitrate may help if you have a slow connection.
- Language: Changes the language of the application. Requires a restart.
- Find My Aircraft: Tap to enter a map screen which will display the last known location of your aircraft.
- Help: Tap to view this help page. Requires an Internet connection to access the first time. After that, it will be cached for offline use.
- Reset All Settings: Tap to reset all settings. Requires a restart.
- Check and Sync License: Tap to synchronize your Litchi app's paid license with your Litchi account. This will unlock additional features in Mission Hub.
- Delete My Account: Tap to be redirected to the account section on Litchi's website in order to delete your Litchi account.
Aircraft
- Go Home Altitude: Use this to set the altitude that the aircraft will return at when Return to Home is triggered.
- Maximum Altitude: Sets the maximum flight altitude.
- Dynamic Homepoint: When enabled, the home point will continuously be updated to the current location of your mobile device. Recommended in Follow mode.
- Log Flights: Enable/disable flight logs. On Android, Litchi's flight logs are located in the "Android/data/com.aryuthere.visionplus/files/flightlogs" folder in the storage of your mobile device. You can connect the device to a computer to view these files or install a third party file management app. On iOS, Litchi's flight logs are located in Litchi's "flightlogs" folder, follow the steps in this guide in order to extract them. On iOS, flight logs cannot be disabled.
- Airdata UAV User Token: Enter the token from your https://airdata.com/ account here. Your token should look like this: HD12345678. This token is a secure way to associate your flight logs with your account when they are uploaded to Airdata UAV.
Info Click here to learn more about how to setup Airdata UAV with Litchi. - Airdata UAV Automatic Sync: When enabled, and if your user token is valid, your flight logs will be automatically synced with your Airdata UAV account given the presence of an Internet connection.
- Sync Photo/Video Previews: Photo preview screenshots and video preview screenshots will be automatically taken by Litchi during flights. Using this setting, you can allow Litchi to automatically sync up to 4 or 10 photo/video previews per flight log to your Airdata UAV account. Android only.
Warning This setting may increase the data usage of the app significantly. - Sync with Airdata UAV Now: Use this button to manually trigger a sync of your flight logs with your Airdata UAV account.
- Signal Lost Behavior: This defines the behavior of the aircraft if signal is lost; choose between "Hover", "Landing" or "Return To Home".
- Exit Waypoint Mission on Signal Loss: When enabled, waypoint missions will end when signal is lost. When that happens, the drone will then execute the failsafe procedure (which can be changed with the "Signal Lost Behavior" setting). This setting cannot be changed for newer DJI drones (Mavic Mini 1, Mini 2, Mini SE, Mavic Air 2 and Air 2S) as they are not able to continue waypoint missions beyond signal range.
- Smart Return to Home: Enables/disables the Smart Return-To-Home (RTH) feature. When it is enabled, aircraft will request to go home when remaining battery is only enough for completing the go-home action.
- Collision Avoidance: Enables/disables collision avoidance. Drones equipped with obstacle avoidance hardware only.
- Disable Sideways Flight: Disables/enables sideways flight (left/right) when Collision Avoidance is set to Bypass mode. Only for drones that support Bypass collision avoidance mode.
- Active Obstacle Avoidance: Enables/disables active obstacle avoidance. When enabled, and an obstacle is moving towards the aircraft, the aircraft will actively fly away from it. If while actively avoiding a moving obstacle, the aircraft detects another obstacle in its avoidance path, it will stop. Collision Avoidance must also be enabled. Mavic/Phantom 4 (Advanced/Pro/ProV2)/Inspire 2/Spark only. iOS only.
- Advanced Pilot Assistance System (APAS): Enables/disables DJI's Advanced Pilot Asistance System. Supported drones only.
- Landing Protection: Enables/disables landing protection. During auto-landing, the downward facing vision sensor will check if the ground surface is flat enough for a safe landing. If it is not and landing protection is enabled, then landing will abort and need to be manually performed by the user. Supported drones only.
- Precision Landing: Enables/disables precision landing. When enabled, the aircraft will record its take-off location visually (as well as with GPS). On a Return-To-Home action the aircraft will attempt to perform a precision landing using the additional visual information. This method only works on a Return-To-Home action when the home location is successfully recorded during take-off, and not changed during flight. Supported drones only.
- Vision Positioning System: Enables/disables the vision positioning system. Supported drones only.
- Front Aircraft LEDs: Switches the aircraft's front LEDs on or off.
- Bottom Light: Switches between Auto/On/Off for the bottom light when present.
- Minimum Location Accuracy: This setting defines the minimum location accuracy required for Follow mode to work. If the mobile device GPS shows a higher accuracy than this value, Follow sessions will fail to start. Additionally, if during a Follow session the mobile device GPS accuracy jumps to a value that is higher than this setting, the aircraft will stop moving until the accuracy comes back to a healthy level. As a result, it is important to set this value correctly. It defaults to 10 meters, but if you are having issues with GPS accuracy and depending on your environment, you may want to increase the default value.
- Gimbal mode: Switch between the FPV mode, Yaw Follow mode (default) and Free (Inspire series only). In FPV mode, the gimbal will synchronize with the movement of the drone to provide a first-person perspective flying experience.
- Gimbal Gesture Control: When enabled, tap the video screen and scroll up or down (as well as left/right for drones which support gimbal yaw rotation) to move the gimbal.
- Gimbal Extension (+30°): When enabled, the gimbal's maximum pitch angle is extended to +30° above horizon, instead of the default 0°. Not supported for Spark.
- Lock Gimbal when Shooting Photos: Enables this to lock the gimbal when the camera is shooting a photo. The gimbal will keep the attitude when starting to shoot the photo.
- Gimbal Endpoint Auto Release: When enabled, the Inspire 2 will automatically rotate when the gimbal reaches the yaw angle limit. Inspire 2/iOS only.
- Sync Gimbal Yaw with Aircraft Heading: Enables this to make the gimbal rotate simultaneously with the aircraft's heading when you control the aircraft's heading with the remote controller.
- Frequency Band: Sets the frequency band. Supported drones only.
- Preview Quality: For Lightbridge-based drones only (P3/P4/I1/I2). Select the quality of the video stream from 4/6/8/10 Mbps or Auto. When set to Auto, both the channel and preview quality will be selected automatically.
- Transmission Channel: For Lightbridge-based and WiFi drones (Spark/Mavic Air/P3/P4/I1/I2). Select a specific transmission channel or Auto. When set to Auto, both the channel and preview quality will be selected automatically.
- Ocusync Preview Quality: For Ocusync-based drones only. Select the channel bandwidth between 10MHz and 20MHz or Auto. On Auto, both the channel and preview quality will be selected automatically.
- Ocusync Transmission Channel: For Ocusync-based drones only. Select a transmission channel or Auto. On Auto, both the channel and preview quality will be selected automatically.
- Double Output (HDMI): Enable to have the video stream output to the HDMI module in addition to the app.
- Display Secondary Video Feed: Enables showing the secondary video feed. Only for drones which have more than one camera.
- Primary Video Feed Source: Select which camera will be the primary video feed. Only for drones which have more than one camera. Android only.
- Secondary Video Feed Source: Select which camera will be the secondary video feed. Only for drones which have more than one camera. Android only.
- Lightbridge 2 Video Source: For Lightbridge 2 drones only. Select the video source that will be displayed in the app.
- Enable DJI's Gimbal Interpolation in Waypoint mode: For DJI Go/older drone models only. When enabled, and if at least one waypoint's gimbal pitch setting is set to Interpolate, then DJI's native gimbal pitch interpolation will be used during the waypoint mission. This means that gimbal pitch control will continue to work when signal is lost, however only Interpolate gimbal mode is supported (Focus POI is not supported).
- Calibrate Compass: Tap to start calibration procedure. The aircraft LEDs will turn solid yellow and you can then start the "calibration dance".
Camera
- Auto Record: Enable/disable Auto recording. Auto record starts/stops when motors start/stop.
- Auto Stitch Panoramas: When enabled, after shooting a panorama Litchi will automatically try to stitch it in the background in low quality (only if the device has at least 1GB of free RAM and the pano has less than 28 photos total). iOS only.
- Hardware Decoding: Enable/disable hardware video decoding for the live video preview. Some devices may perform better with the hardware video decoder. iOS only.
- Cache Videos: When enabled, recording videos with the drone will also cause Litchi to save the video to the "Litchi Video Cache" album in the Photos app. iOS only.
- Cache Photos: When enabled, photos you take will be saved to the 'Litchi Photo Cache' album (in the Photos app). Photo Caching does not work when the image format is set to RAW or when using the Interval capture mode. Photo Caching does not work during Waypoint, Pano and Track sessions. iOS only.
- Photo Preview: Requires "Cache Photos" setting to be enabled. When enabled, after taking a photo a preview will be shown along with a share button providing an easy way to share the photo to other apps. iOS only.
- Peak Focus Threshold: For cameras which have variable focus, this setting will highlight the areas that are in focus.
- Over Exposure Warning: Highlights overexposed areas on the video preview.
- Enhance Display for D-Log Filter: When using the D-Log digital filter, the video preview will be enhanced for better visibility. iOS only.
- Grid Lines: Show/hide grid lines on the video screen, useful to help framing a shot.
Speech
- Enable Speech: Enables/disables voice announcements and warnings.
- Feedback Frequency: In seconds, determines the minimum frequency at which the voice feedback will be made.
- Altitude Feedback: Enables/disables continuous altitude feedback.
- Distance Feedback: Enables/disables continuous distance feedback.
- Speed Feedback: Enables/disables continuous speed feedback.
- Battery Feedback: Enables/disables continuous battery feedback.
- Smart RTH Warning: Enables/disables smart RTH voice warning when flying in VR mode. iOS only.
- Warnings Frequency: In seconds, determines the minimum frequency at which the voice warnings will be made. Android only.
- Warn When Battery Drops Below: Voice warnings for the aircraft battery will start at this percentage. Android only.
- Warn If Satellite Count Drops Below: There will be voice warnings for the satellite count whenever it drops below this value. Android only.
Keys
You can set up to 2 different custom functions, for the C1 (left) and C2 (right) custom keys located on the remote controller.
You can also bind 2 different custom functions to C1 Long press and C2 Long press.
For the Mavic Mini 1 and Mini SE: C1 is the RTH button and C2 is not available. Long press is not supported.
For the Mini 2/Mavic Air 2/Air 2S: single tap on Fn button for C1, double tap on Fn button for C2. Long press is not supported.
For the Spark and Mavic Air: C1 is also called the Fn button.
In addition, for Mavic Pro, Mavic 2 Zoom/Pro or when using the Smart Controller/RC Pro you can bind custom functions to any of the 5 buttons of the 5D joystick.
- Map/Video Switch: Switches between the video and map as full screen/small screen.
- Recenter Gimbal: Toggles the gimbal between horizon and looking down and recenters the gimbal yaw.
- Gimbal Pitch/Yaw: Inspire 1-2 only, switches between pitch and yaw gimbal control for the remote controller wheel.
- VR mode: Toggles VR mode.
- Pause/Resume Flight: Depending on the current autonomous flight mode status, pauses/stops or resumes the flight.
- Home Point at Aircraft: Moves the Home Point to the aircraft's current location. You must be flying in order to move the Home Point.
- Home Point at Device: Moves the Home Point to the mobile device's current location. You must be flying in order to move the Home Point.
- Front LEDs: Switches the aircraft's front LEDs on or off.
- Toggle Mobile Device Camera (VR): In VR mode, use this to switch between the drone's camera view and the mobile device's camera view. Useful if your goggles expose the mobile device's camera to the outside.
- Toggle VR Immersive: In VR mode, use this to enable/disable the Aircraft Head Tracking mode 'Immersive'.
- Toggle VR Joystick: In VR mode, use this to enable/disable the Aircraft Head Tracking mode 'Joystick'.
- Center Autofocus: For cameras with variable focus, this custom function will trigger autofocus at the center of the video preview.
- Zoom In: Zooms in. Only works for supported cameras and resolutions.
- Zoom Out: Zooms out. Only works for supported cameras and resolutions.
- Toggle Portrait Mode: Toggle the camera's Portrait mode. Mavic Pro only.
- AE Lock/Unlock: Auto exposure lock/unlock.
- Focus to Infinity: Sets the camera focus to Infinity (everything in focus). Before using this function, we recommend calibrating the lens in the camera settings.
- Toggle Tripod Mode: Enable/disable Tripod mode. In Tripod mode, the maximum speed is limited to 2.2mph (3.6kph). Responsiveness to joystick movements is also reduced for smoother and more controlled movements. This custom function is only supported by the following drone models: Phantom 4 Normal/Advanced/Pro/ProV2, Inspire 2, Spark, Mavic Air/Pro
- Switch Video Feed: Switches between the main and secondary cameras when the drone supports more than one camera. iOS only.
- Toggle 2nd Video Feed: Shows/hides the secondary video feed. Android only.
- Bottom Light: Toggles between Auto/On/Off for the bottom light when present.
- Increase Exposure: Increases the camera exposure by 1 stop.
- Decrease Exposure: Decreases the camera exposure by 1 stop.
- Change Exposure Setting: Changes the exposure setting affected by the "Increase/Decrease Exposure" custom functions between ISO/Shutter Speed/Aperture/Exposure Compensation.
- Switch Flight Mode: For Mavic Mini 1 and Mini SE, switches the flight mode between P/Normal, Sport and Cine/Tripod.
- Switch Camera Lens: For cameras with multiple lenses (H20, H20T, M2EA), switches between the different camera lenses.
- Course Lock (FPV, Focus): In FPV mode, Toggles Course Lock. In Focus mode, resets the "Joystick Reference" setting when "Aircraft Rotation" is enabled and "Joystick Reference" is set to "Aircraft Heading".
- Home Lock (FPV): Toggles Home Lock.
- POI at Aircraft (Waypoint, Orbit, Focus): In Waypoint, Orbit and Focus mode, adds a Point of Interest at the aircraft location.
- POI at Device (Waypoint, Orbit, Focus): In Waypoint, Orbit and Focus mode, adds a Point of Interest at the mobile device location.
- Waypoint at Aircraft (Waypoint): In Waypoint mode, adds a waypoint at the aircraft location. The newly added waypoint will have its altitude, heading and gimbal pitch angle automatically set to the current aircraft altitude, heading and gimbal pitch angle.
- Waypoint at Device (Waypoint): In Waypoint mode, adds a waypoint at the mobile device location.
- Follow Heading Mode (Follow): In Follow mode, switches the heading mode between "North" and "Course".
- Follow from Aircraft Position (Follow): In Follow mode, sets the relative altitude, distance and heading from the aircraft's current position.
- Subject Offset from Aircraft (Follow): In Follow mode, sets the subject offset setting based on the current aircraft heading relative to the follow heading setting.
- Orbit at Aircraft (Orbit): In Orbit mode, sets the radius and altitude from the aircraft location. Only works if the Orbit center is already set.
FAQ
1. Why is Litchi not connecting to my DJI drone?
Please refer to the General tab section "Connecting Litchi to your drone".
2. Autonomous flights (Waypoint, Orbit, Follow, etc) fail to start, why?
The flight mode should be Normal/P mode (F for older drones) in order for the aircraft to perform autonomous flights. If the problem persists, double check that you are using the latest supported firmware.
3. How to regain control of my aircraft during an autonomous flight when using a remote controller?
Change the flight mode to Sport (Normal/P for older drones). The aircraft will then stop the autonomous flight and you will regain control instantly.
4. Will the aircraft avoid obstacles if there are any?
For drone models which are equipped with obstacle avoidance hardware, it will work when it is enabled. For all other drone models, obstacles will not be avoided.
5. Which firmware version do I need to use Litchi?
The latest public firmware.
6. Is my Android device supported by Litchi?
As a general rule, Litchi supports most mid to high-end Android devices. There are many Android devices and versions out there, and even two similar devices can yield very different results, for this reason there is no list of supported devices. The best way to find out if your device is supported by Litchi is to purchase the application and give it a try. If it ends up not working, you can ask for a refund during the 2 hours window. Please do let us know if you find a problem, and we will do our best to fix it.
7. Follow mode fails to start with error: "Your GPS location is not accurate enough to start Follow mode", why?
This error means that your mobile device GPS is not accurate enough, not to be confused with the aircraft's GPS signal. The "Accuracy" number at the bottom left of the screen shows how good your mobile device GPS signal is. If it is red, you will see this error as your mobile device is not able to determine a precise enough location. Many things can affect your mobile device GPS signal such as weather conditions, your location and environment, etc. In most cases it should be relatively easy to get less than 10 meters accuracy which is the default requirement for Follow to even start. Note that you can adjust this minimum requirement with the "Location accuracy" setting. Setting it to a higher value will allow for a bigger margin of error for the mobile device GPS signal, but the Follow movements may be less precise.
8. What is the difference between Litchi for Android and Litchi for iOS?
Litchi Magic Leash is currently only supported on Android. In-app Pano stitching is currently only supported on iOS.
9. I am experiencing lag/freezes with the video stream, how can I fix it?
First make sure you are using the latest public firmware on both the aircraft and the remote controller if you are using one. Then ensure there are no apps running in the background, including screen recorders. If you have a P3 Standard, P3 4K or Spark on Android, prior to starting Litchi make sure that you force close DJI Fly/Go (or any other SDK apps) by going to your device Settings -> Apps -> DJI Fly/Go -> Force Close. For lightbridge-based drones (P3/P4/I1/I2), make sure you are using 4Mbps as preview quality. If you are still having issues, it is likely that your device is either not compatible or not powerful enough to run Litchi.
10. I purchased the app on one device, can I install it on other devices?
You can install the app on as many devices as you want as long as they use the same platform and the same "main" account (Google, Apple or Amazon) that was used for the original purchase. If you wish to use Litchi on two or more platforms you will need to purchase it on each one.
11. I won't have Internet access where I want to fly, will I still be able to see the maps?
If you cache the maps prior to the flight, you will be able to see them even when offline. To cache maps while connected to Internet, drag the map around where you are planning to fly, zoom in and zoom out. You can exit Litchi in between but avoid restarting the mobile device as it may clear the cache.